How to set up your new QHHS
This guide will show you how to secure your home Wi-Fi network and protect all your Internet-connected devices you own, from laptops and smartphones to smart locks, webcams, smart TVs and gaming consoles.
- Go to Google Play.
- Download and install QHHS App on Android supported smartphone.
-
Open the QHHS app on your smartphone.
Make sure that you are connected to the default Internet network: HS-Unbox. To connect to the network HS-Unbox, you have to enter a password. The password is printed on the back of the QHHS device.
During unboxing, you will create a new network. After the unboxing is complete, you must connect to the new network that you create. Note that the default network HS-Unbox will disappear from the network list.
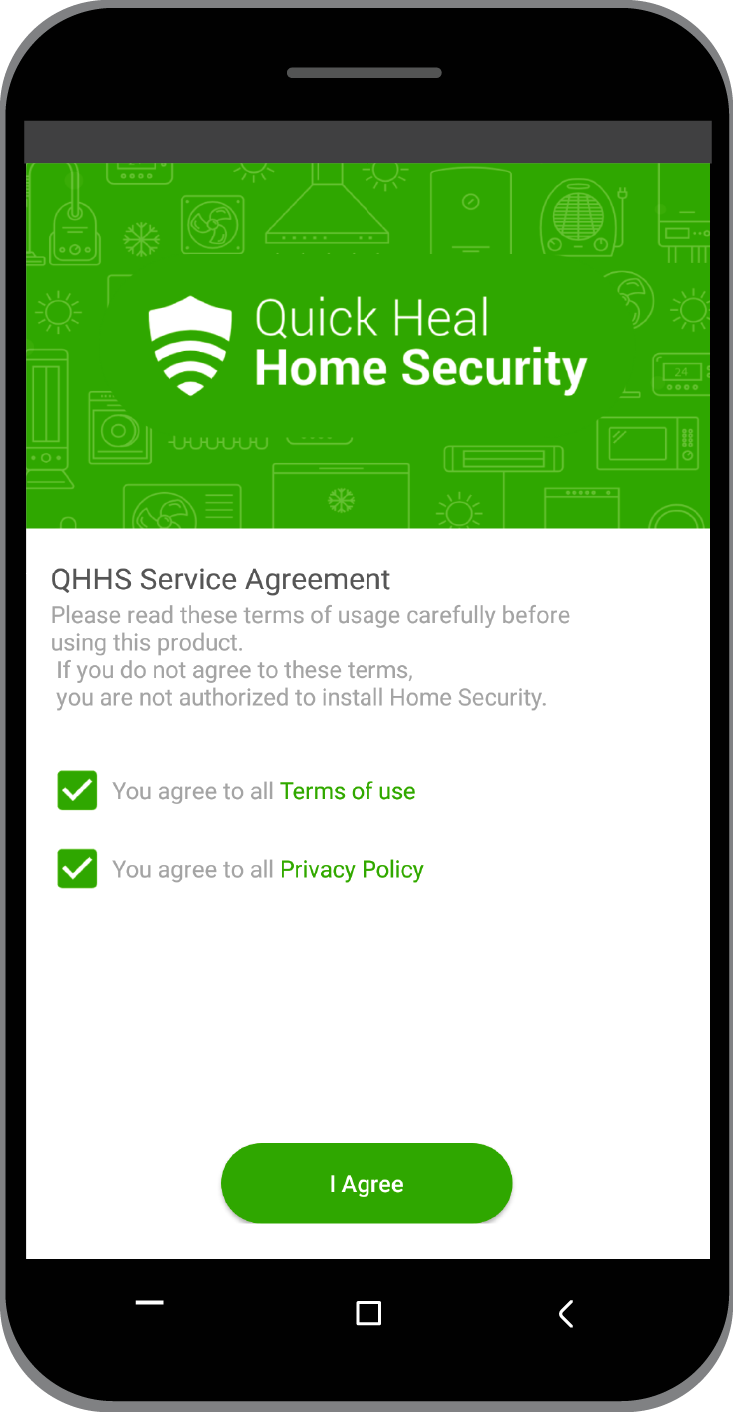
On the first screen, the license agreement and privacy policy appear. Read them carefully.
- Tap I Agree to accept the license agreement and privacy policy.
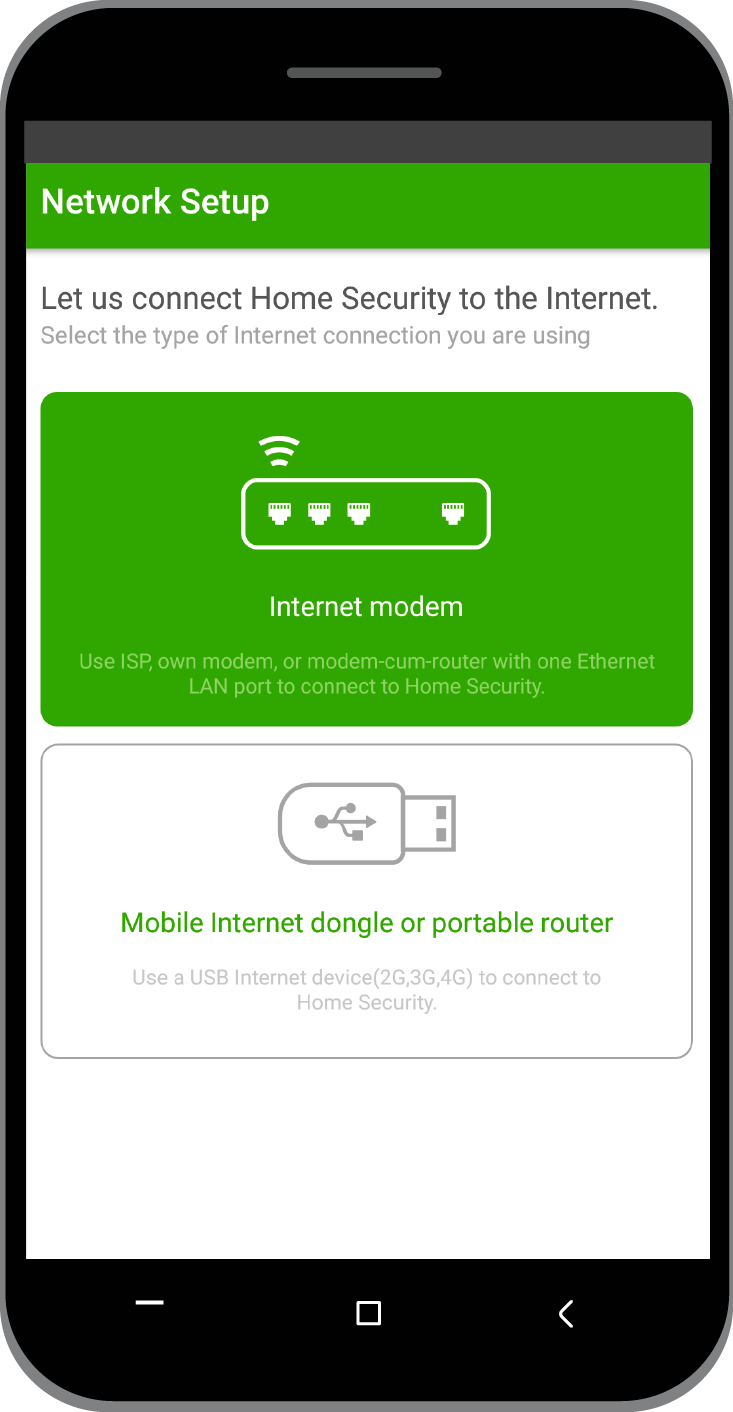
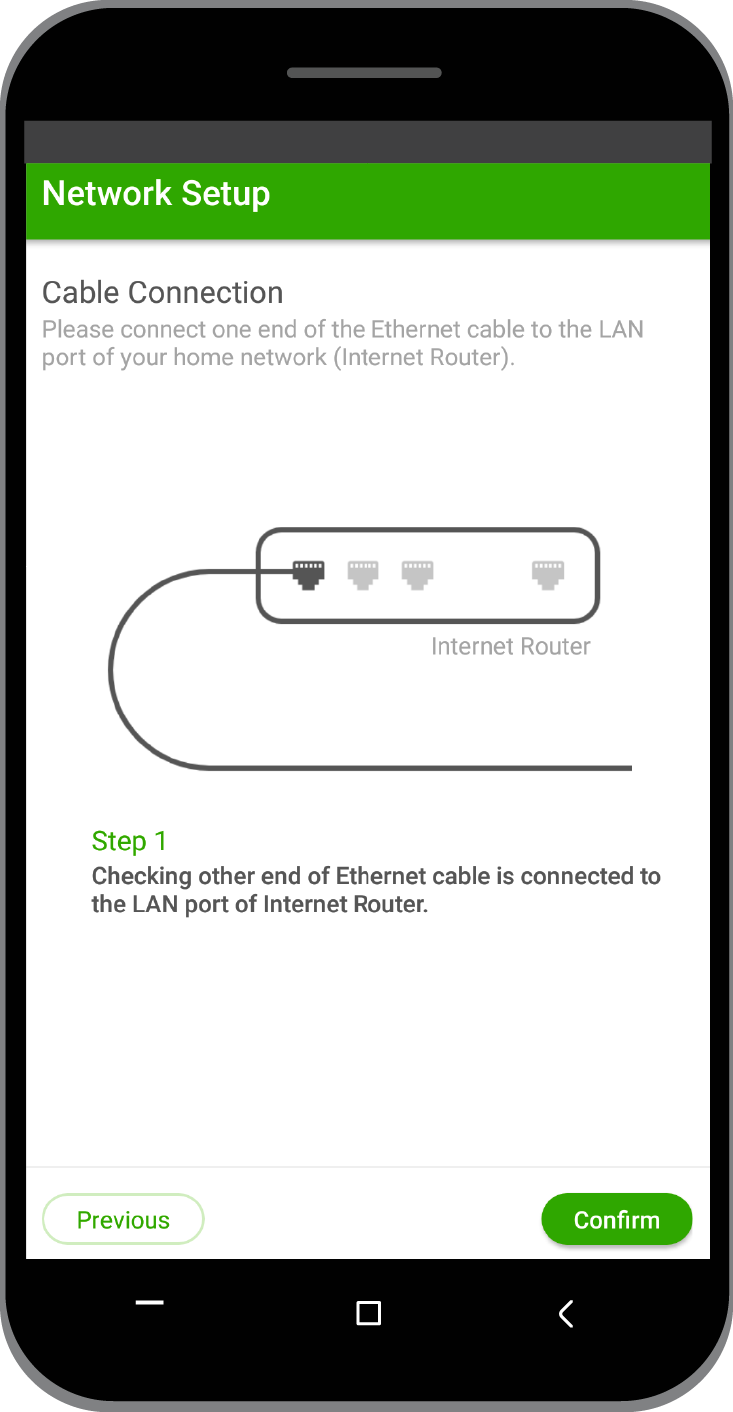
To connect through Internet modem, tap Internet modem on the Network Setup.
Using Internet modem, you can configure the Internet setting through DHCP, IP address, and PPPoE.

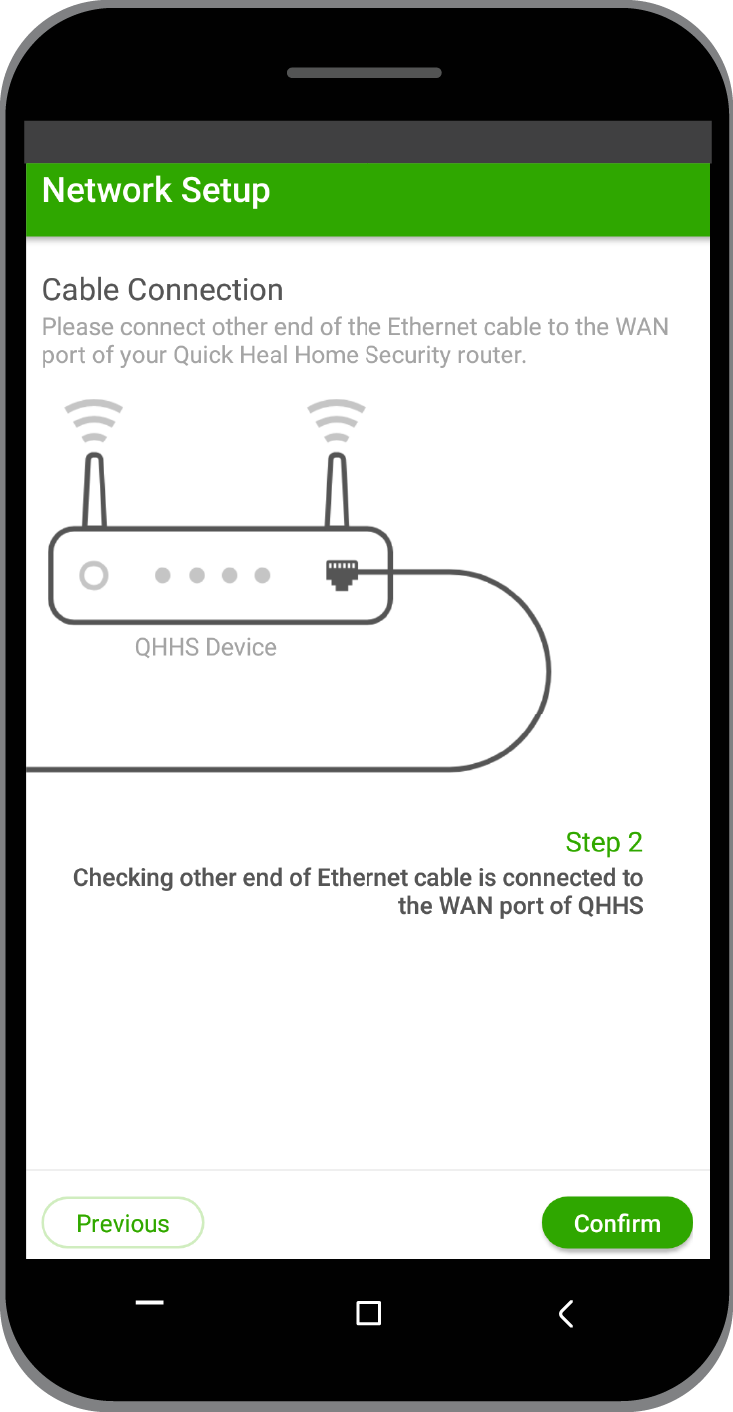
If you select the Internet modem, a cable connection validation screen appears.
Read the on-screen message carefully.
- Tap Confirm.
Note: This is a DHCP (Dynamic Host Configuration Protocol) network protocol that helps to obtain an IP address automatically.
Read the on-screen message carefully.
- Tap Confirm.
Note: If your Internet connection is good, step 1 and step 2 move ahead faster.
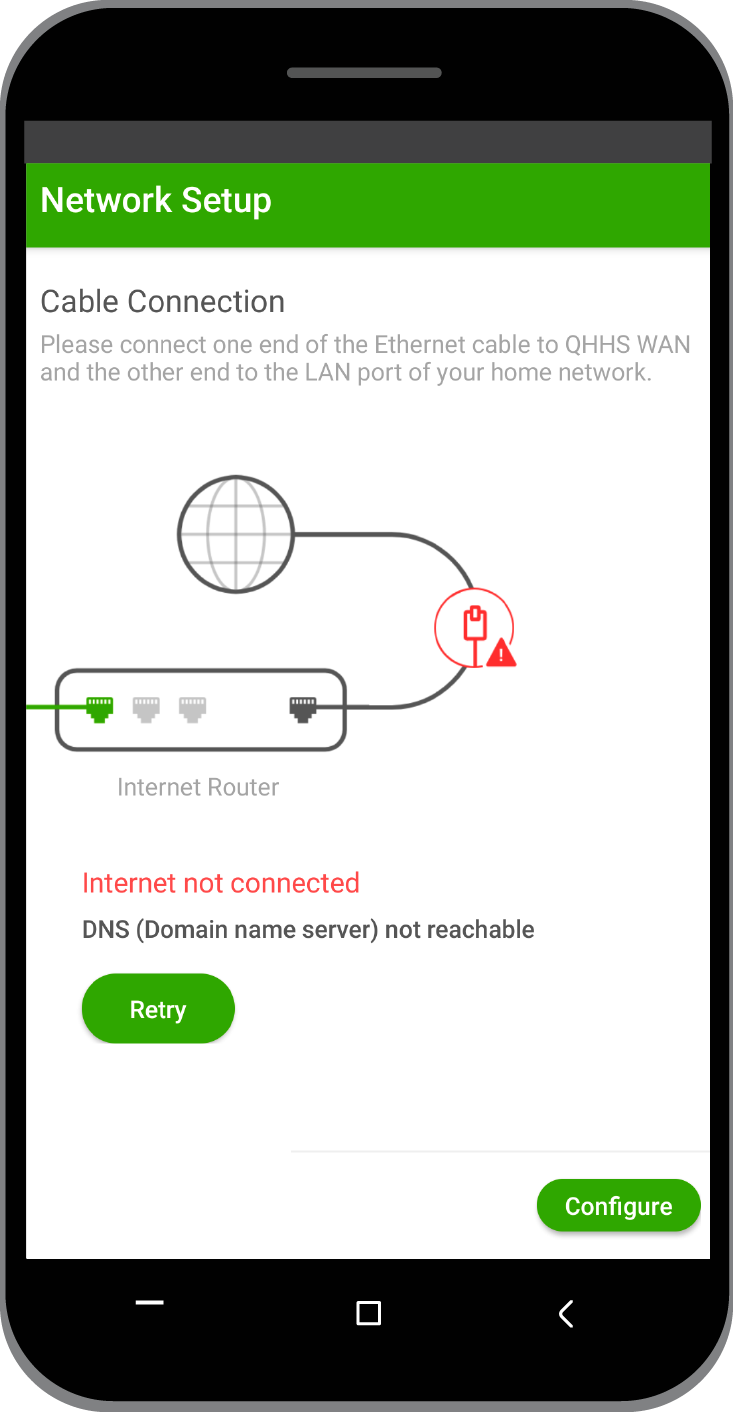
If your network does not get the IP address, an error message appears. You need to configure the IP information manually.
- Tap Retry to check the connection or tap Configure to configure the IP address to get connection.
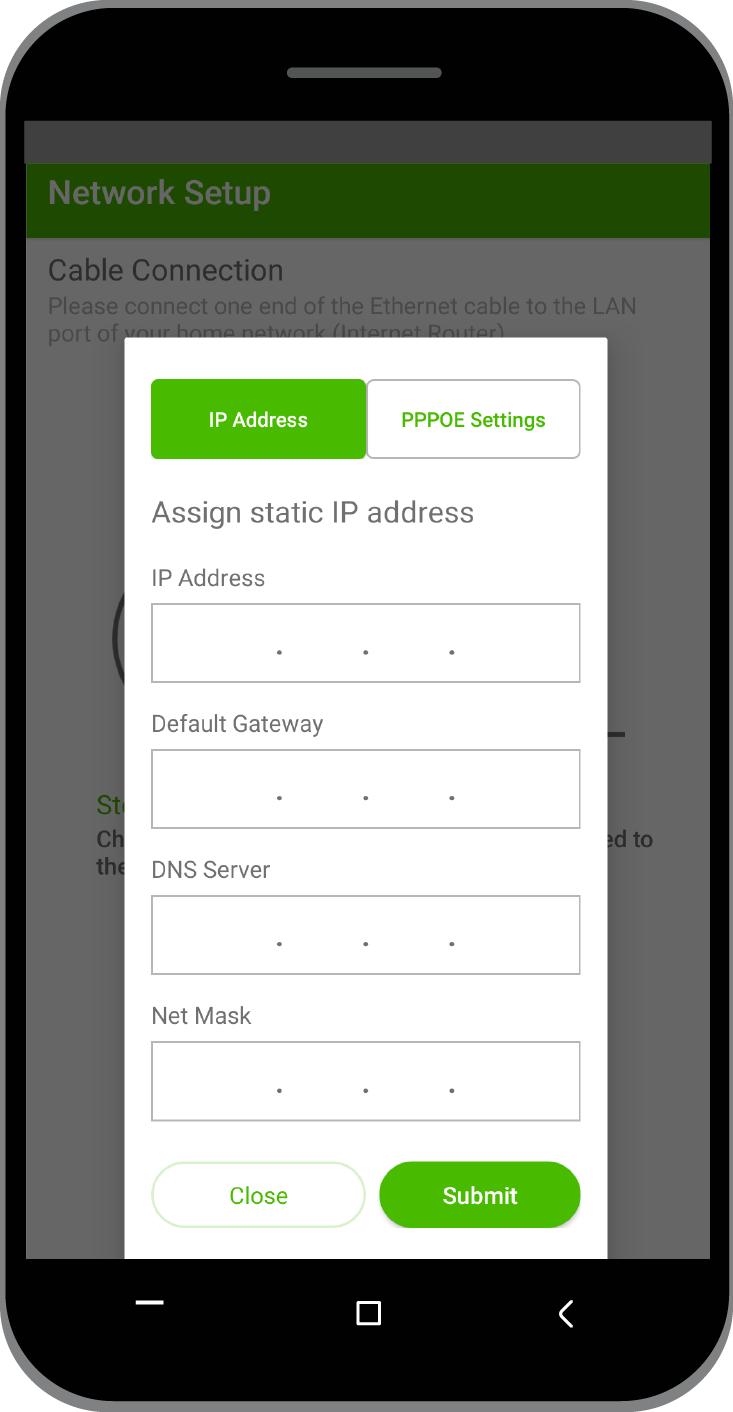
- To configure the IP address, tap IP Address.
- Enter the IP address and other details, and tap Submit.
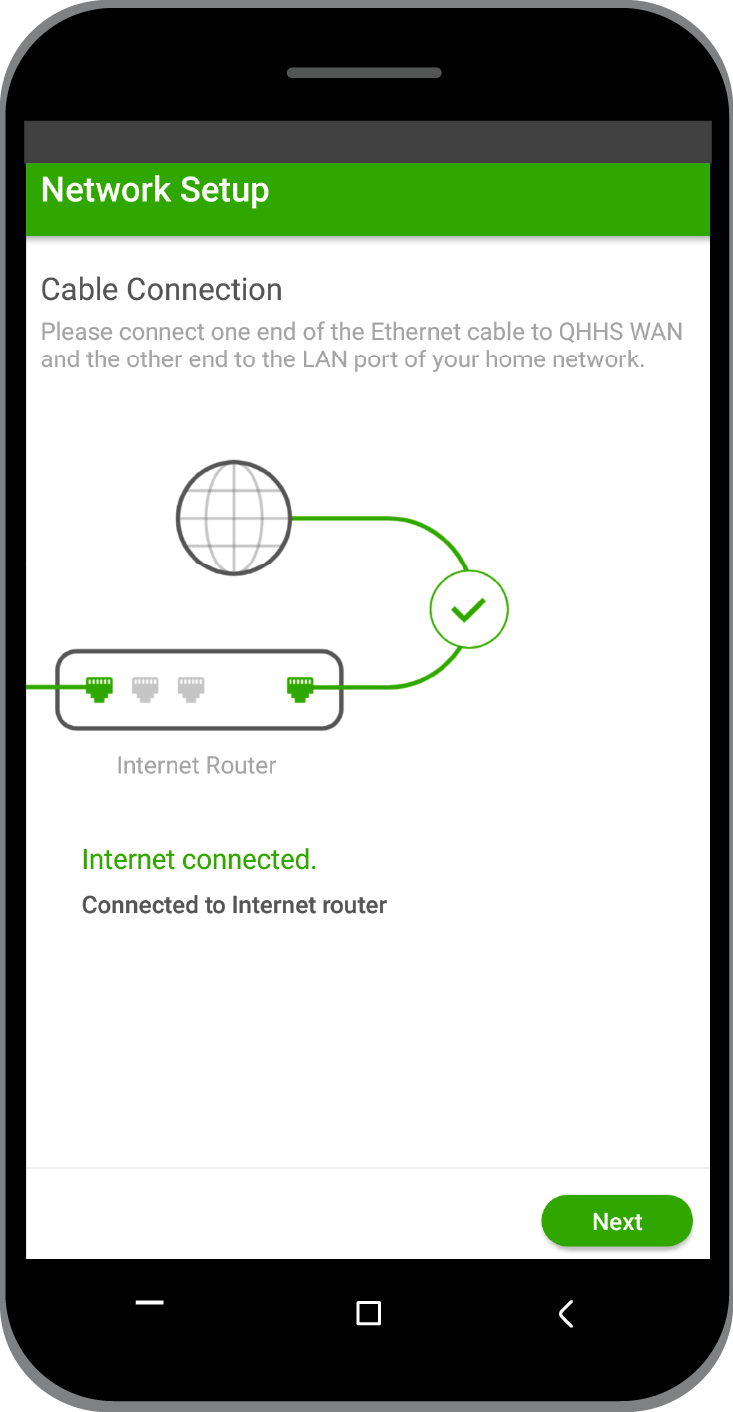
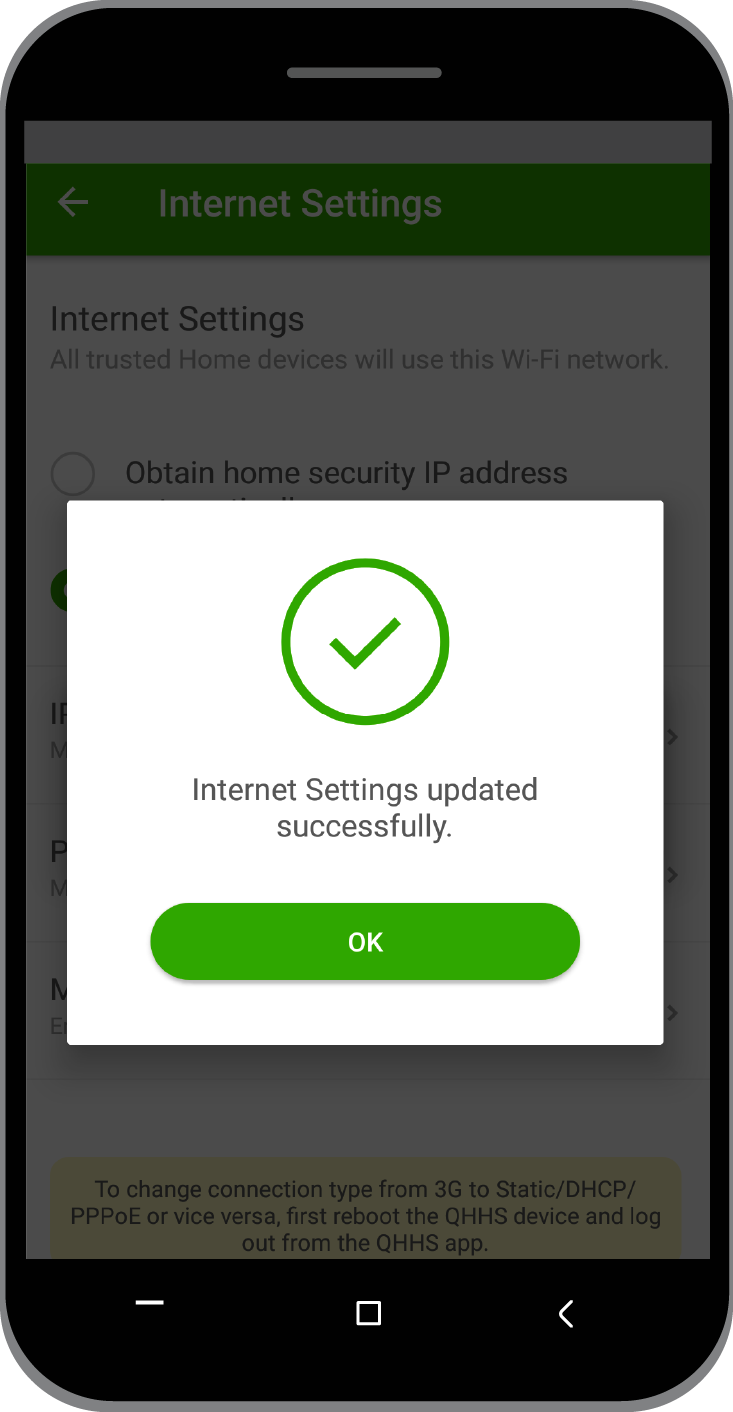
Upon connecting to the Internet successfully, a message appears.
- Tap Next.
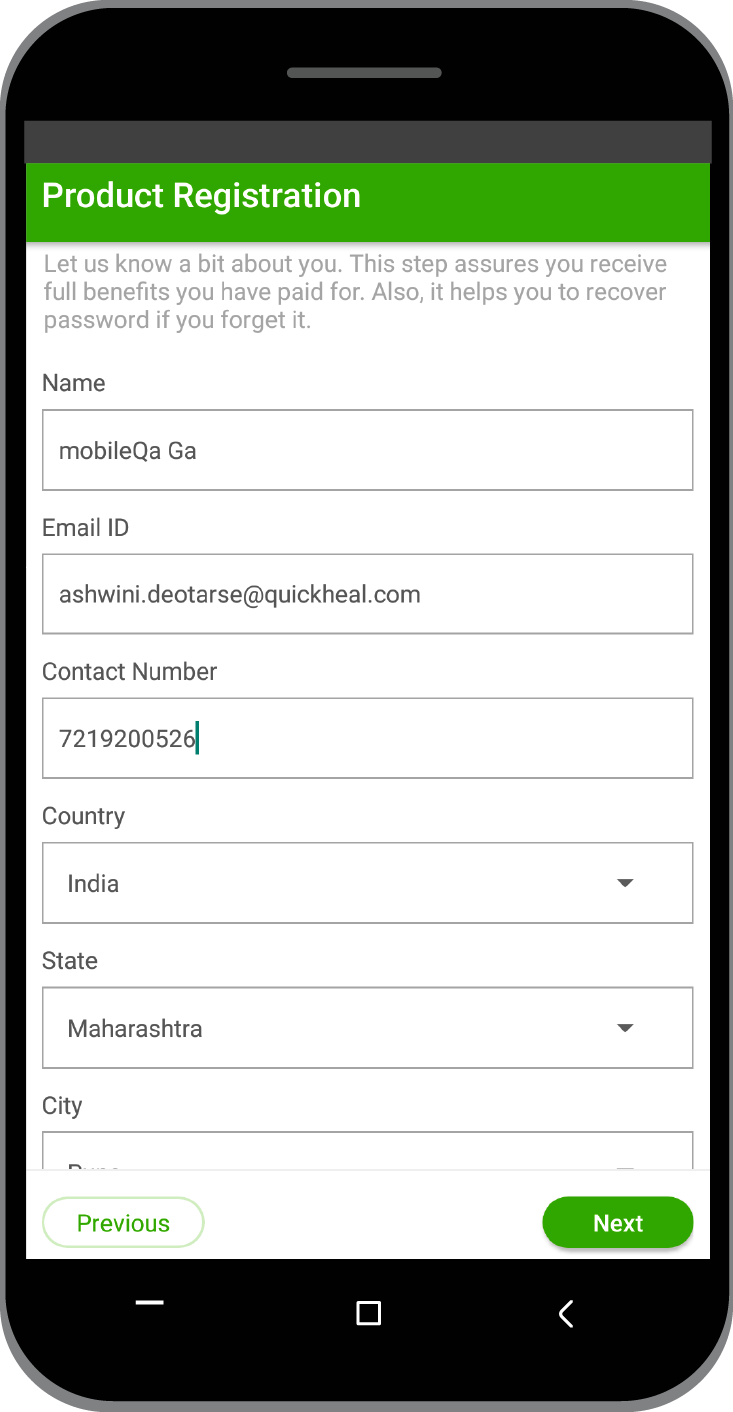
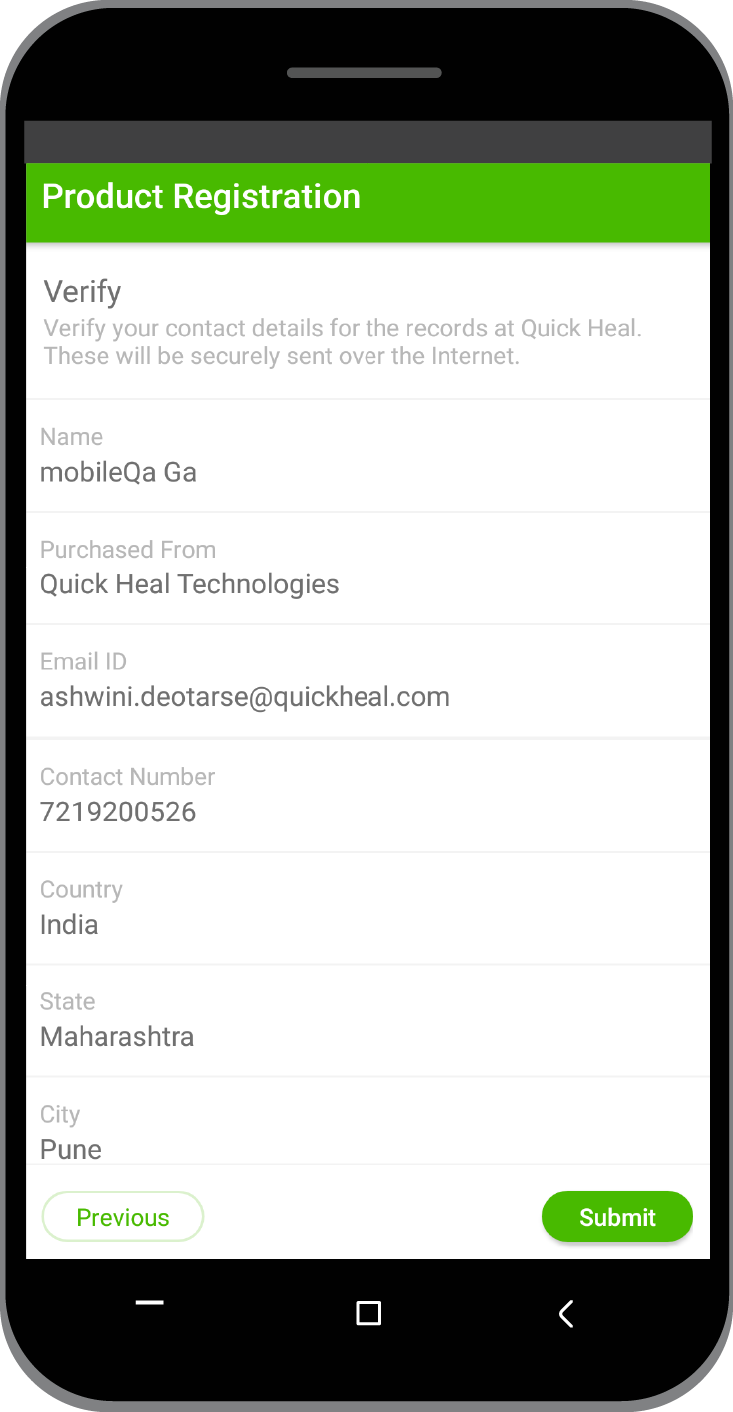
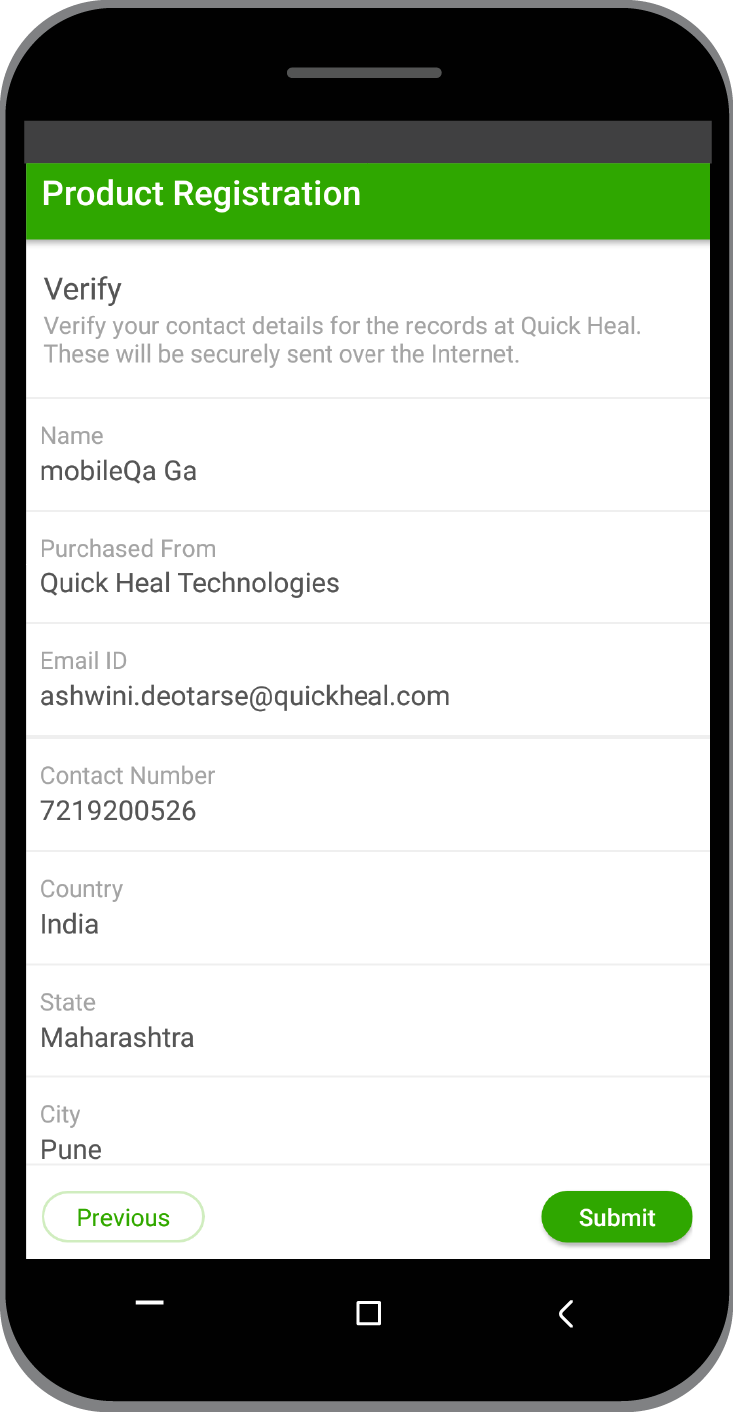
- Enter the information in relevant fields and tap Next.

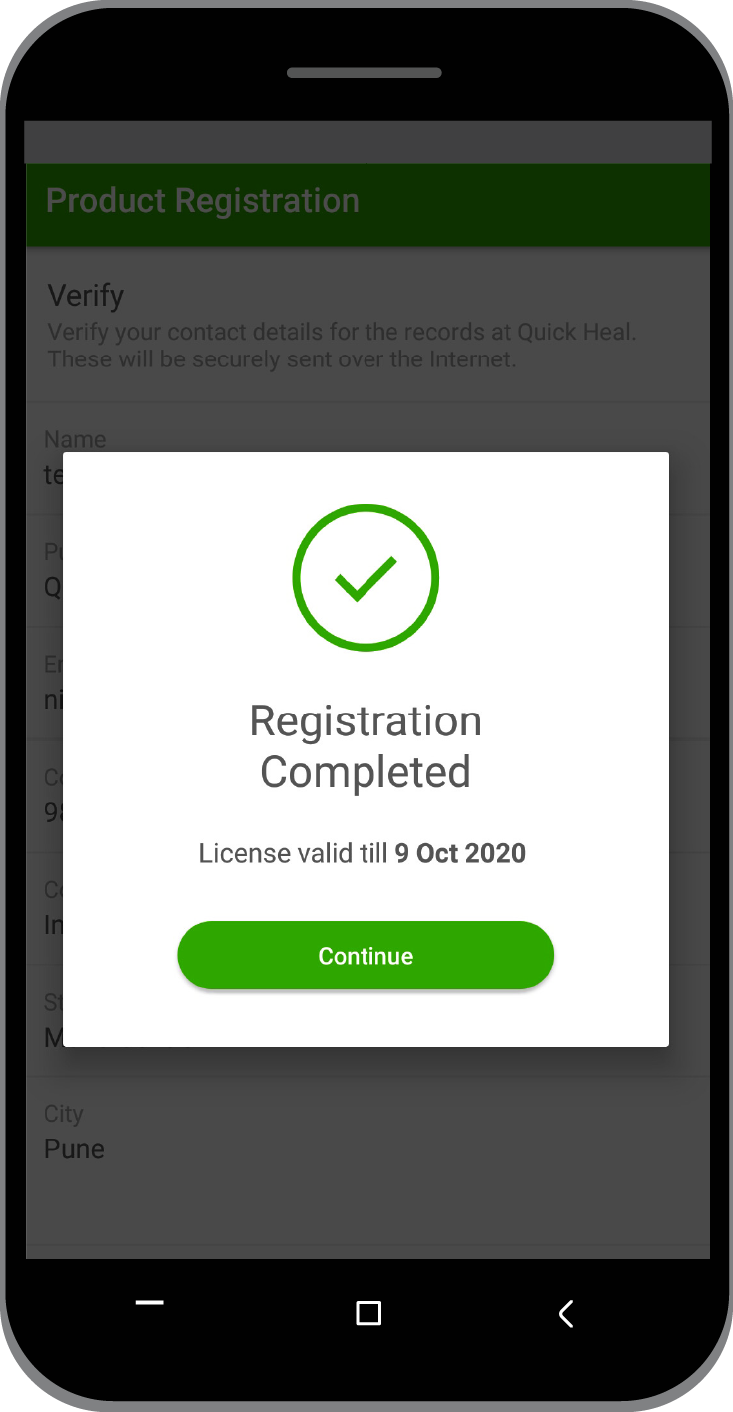
A summary of the information that you entered appears. Verify the information carefully.
- Tap Submit.
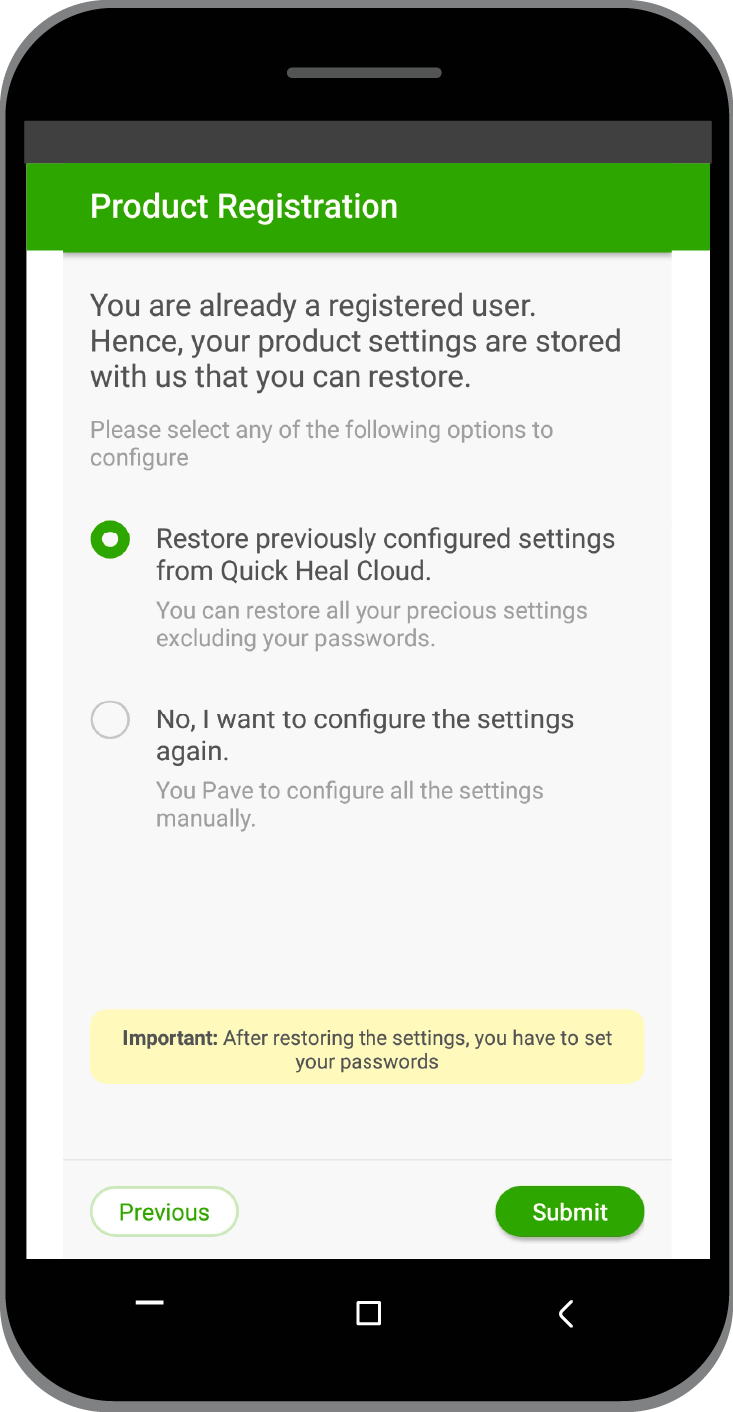
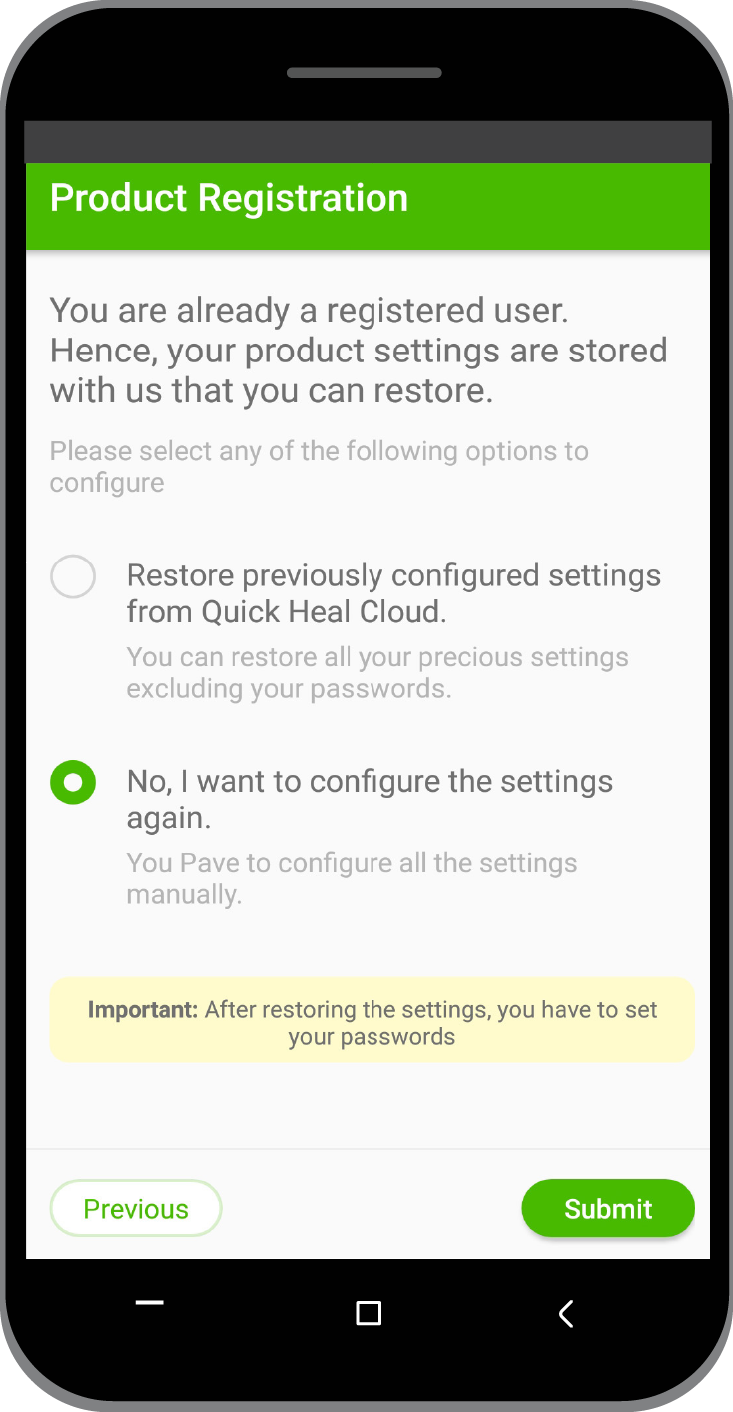
If you have previously registered with the QHHS device, you can restore your settings.
- Select Restore previously configured settings from Quick Heal Cloud and tap Submit.
If you want to register the product afresh, select No, I want to configure the settings again.
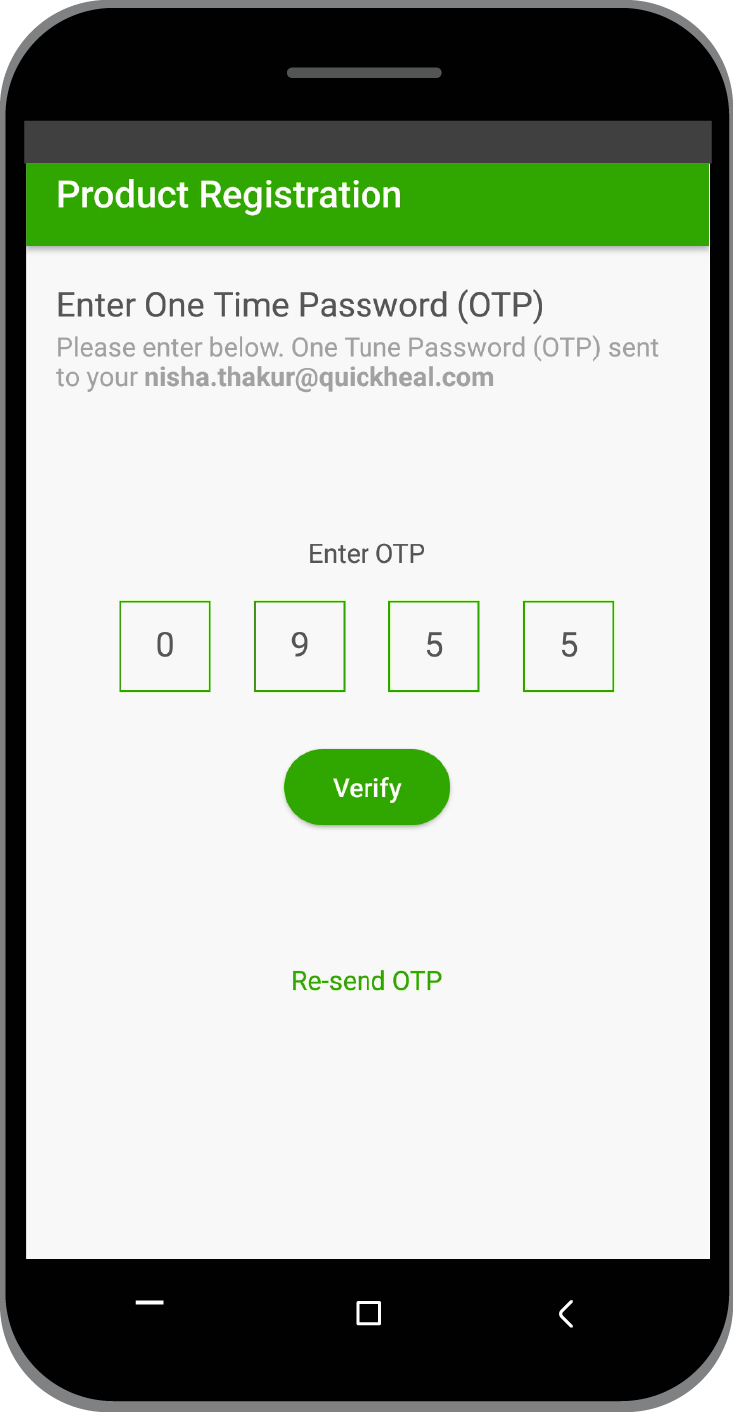
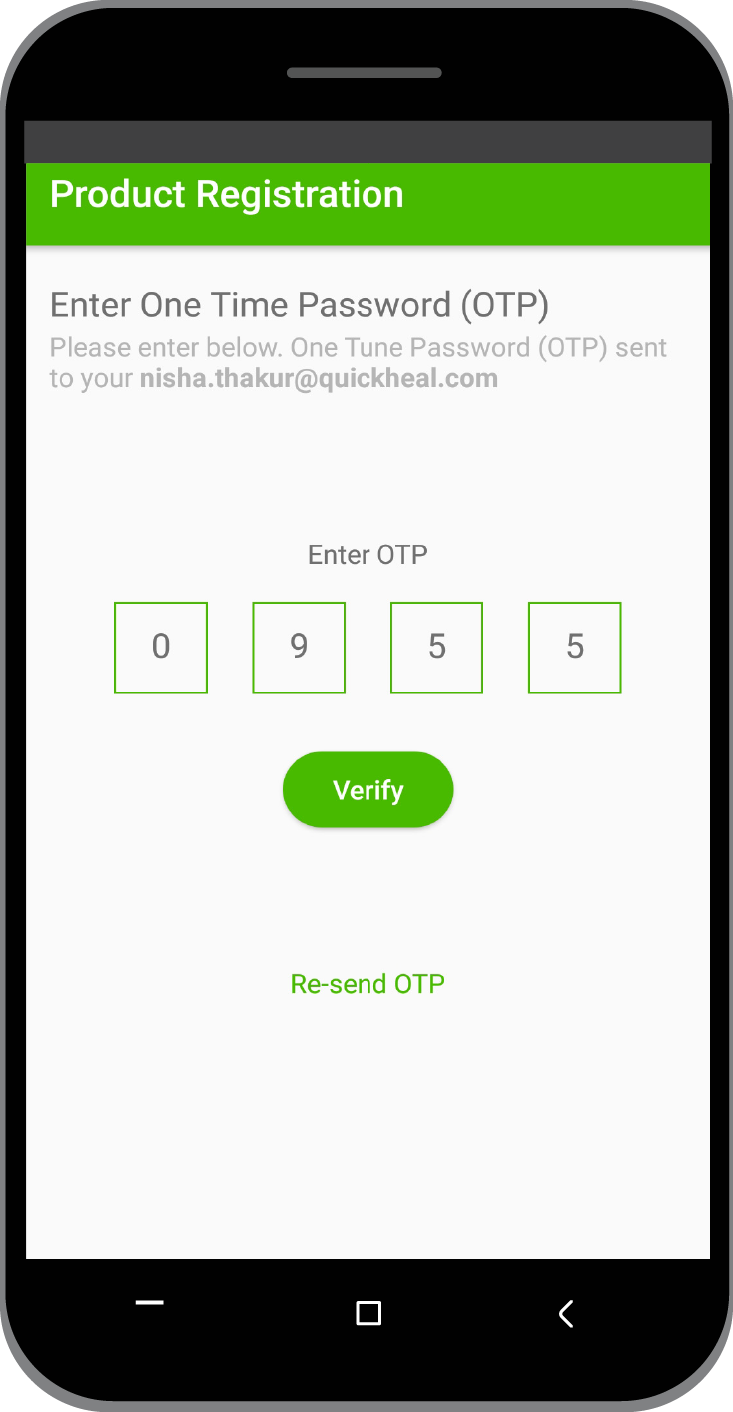
A One-Time Password (OTP) is sent to your registered mobile number and email address.
- Enter the OTP on the Product Registration screen and tap Verify.

-
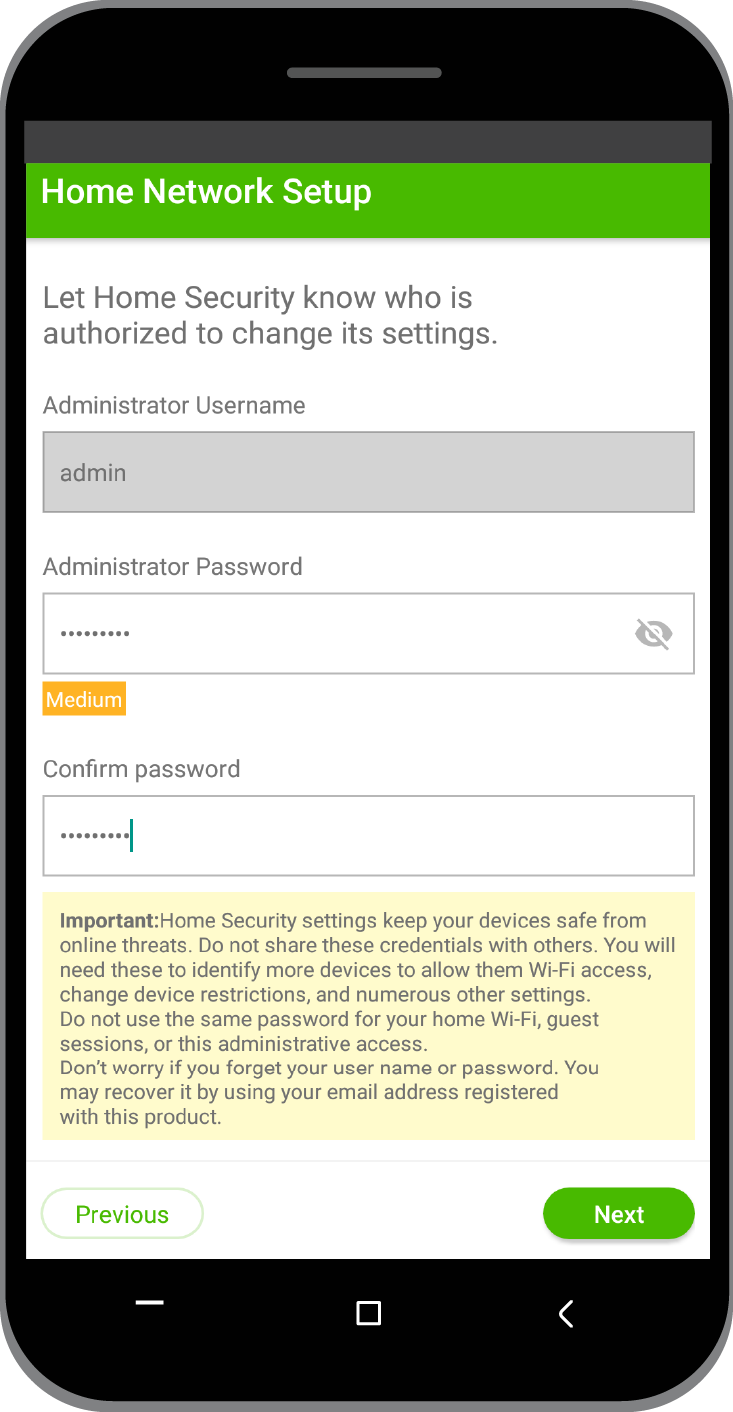
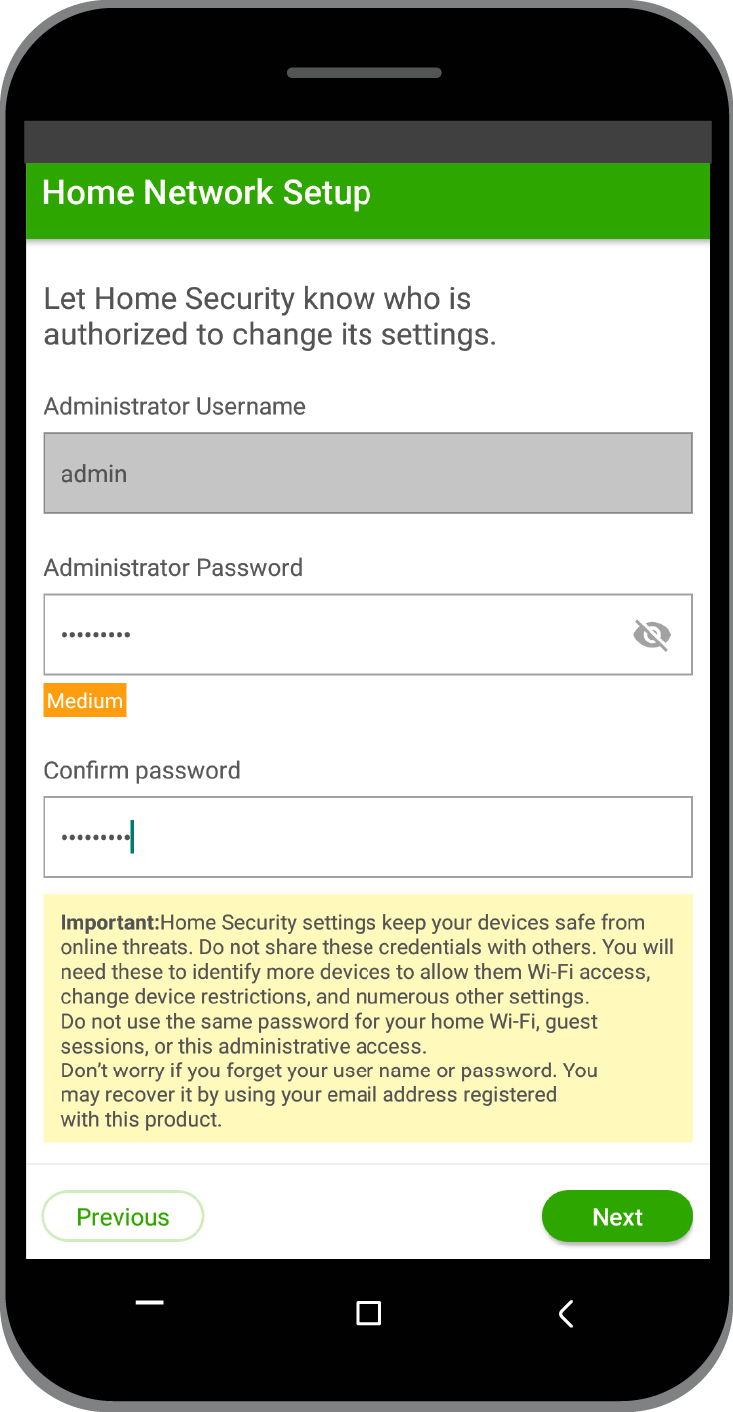
Set a password for the admin user.
“admin” will be your username that you cannot change. The password must be at least 8 characters long.
Tips: Create a strong password with a combination of numbers, letters, and other characters.
- Tap Next.

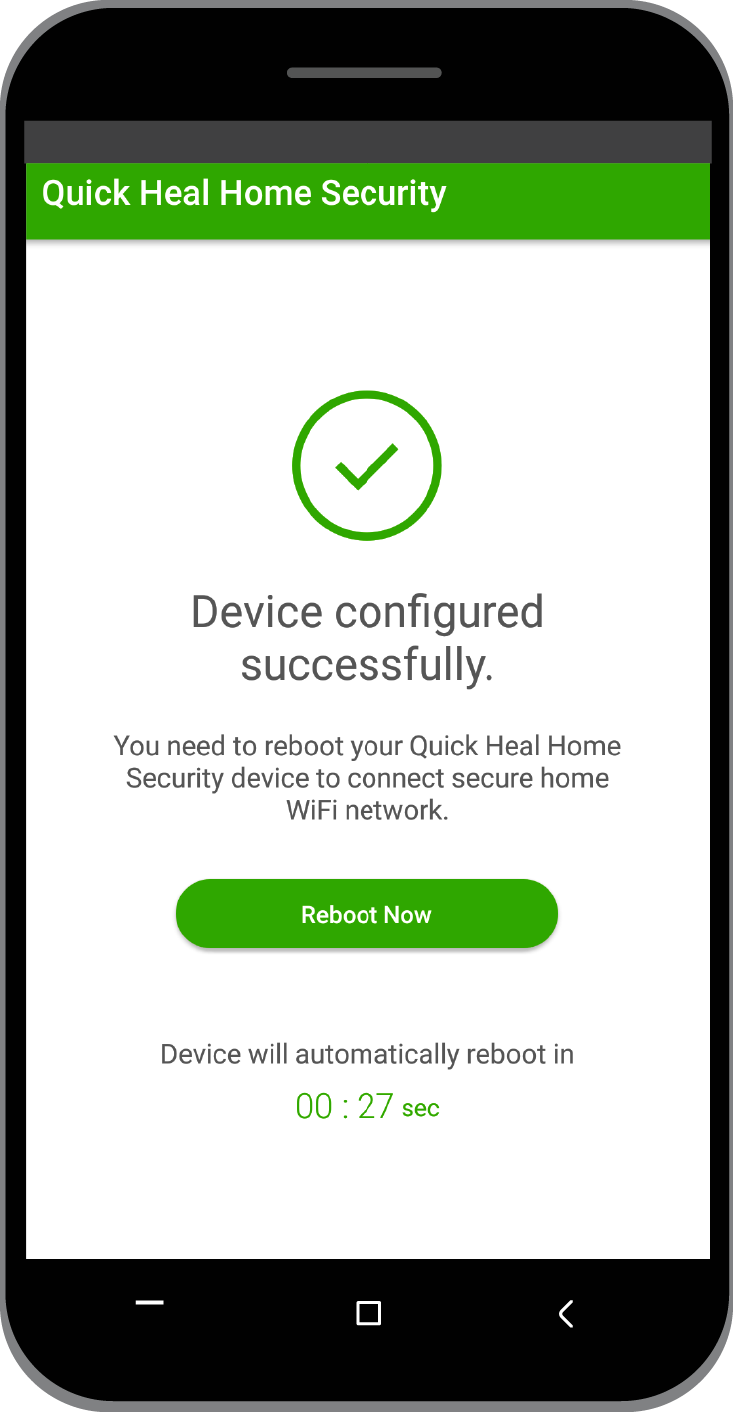
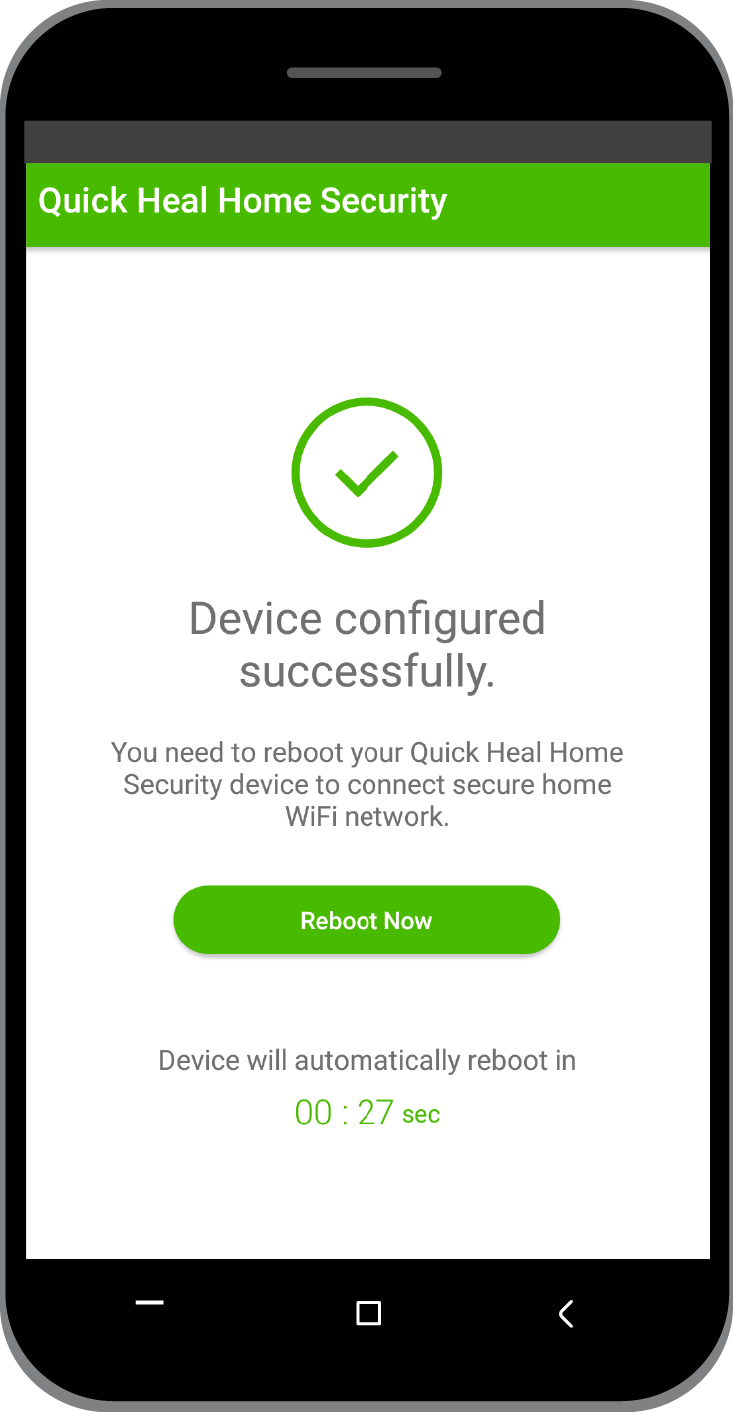
If the configuration is done successfully, the successful message screen appears. You must reboot the device to get started.
- Tap Reboot Now.
It may take a few minutes to reboot.
Tips: Check the connection lights on the QHHS device. Wait until all the connection lights turn on.
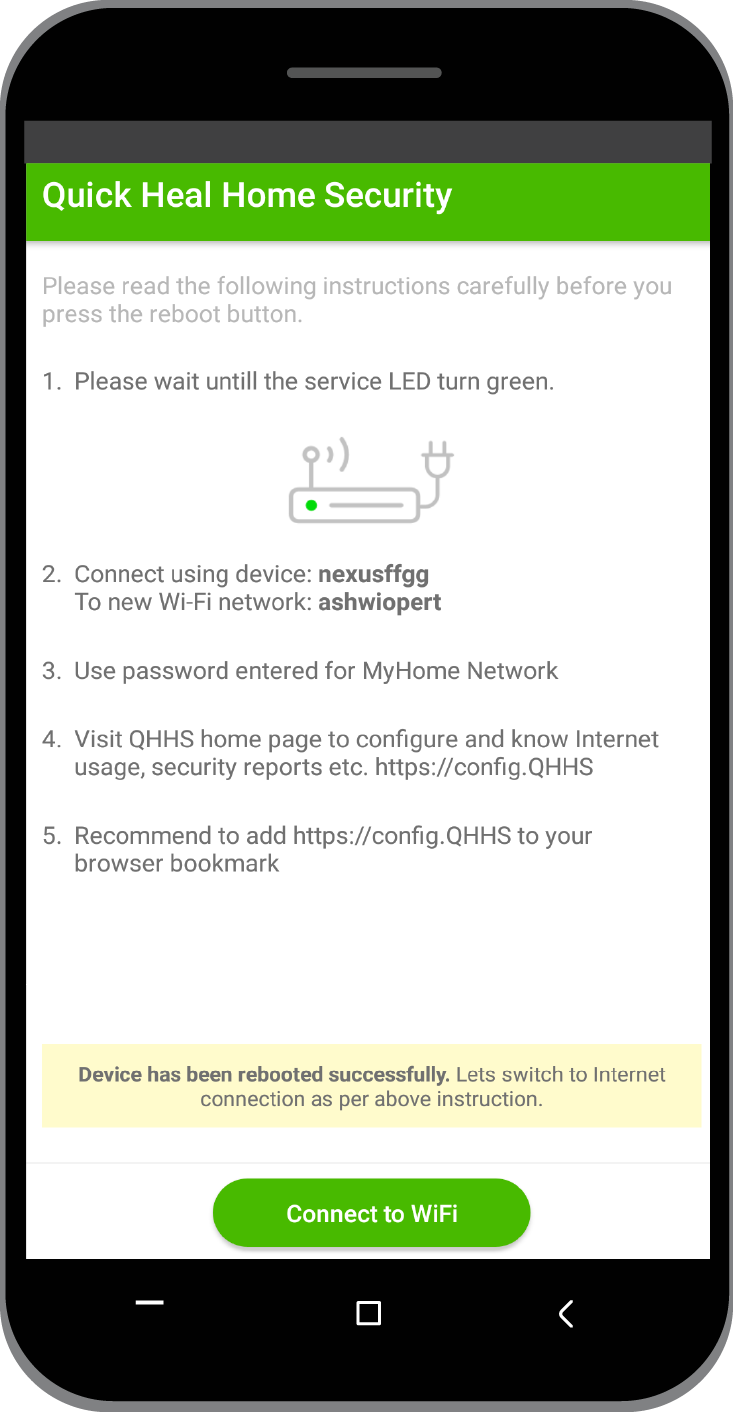
After all the connection lights on the QHHS device turn on, connect to the new network that you create.
If there is any issue in connecting the network, switch off the power of the QHHS device and then switch the device on again.
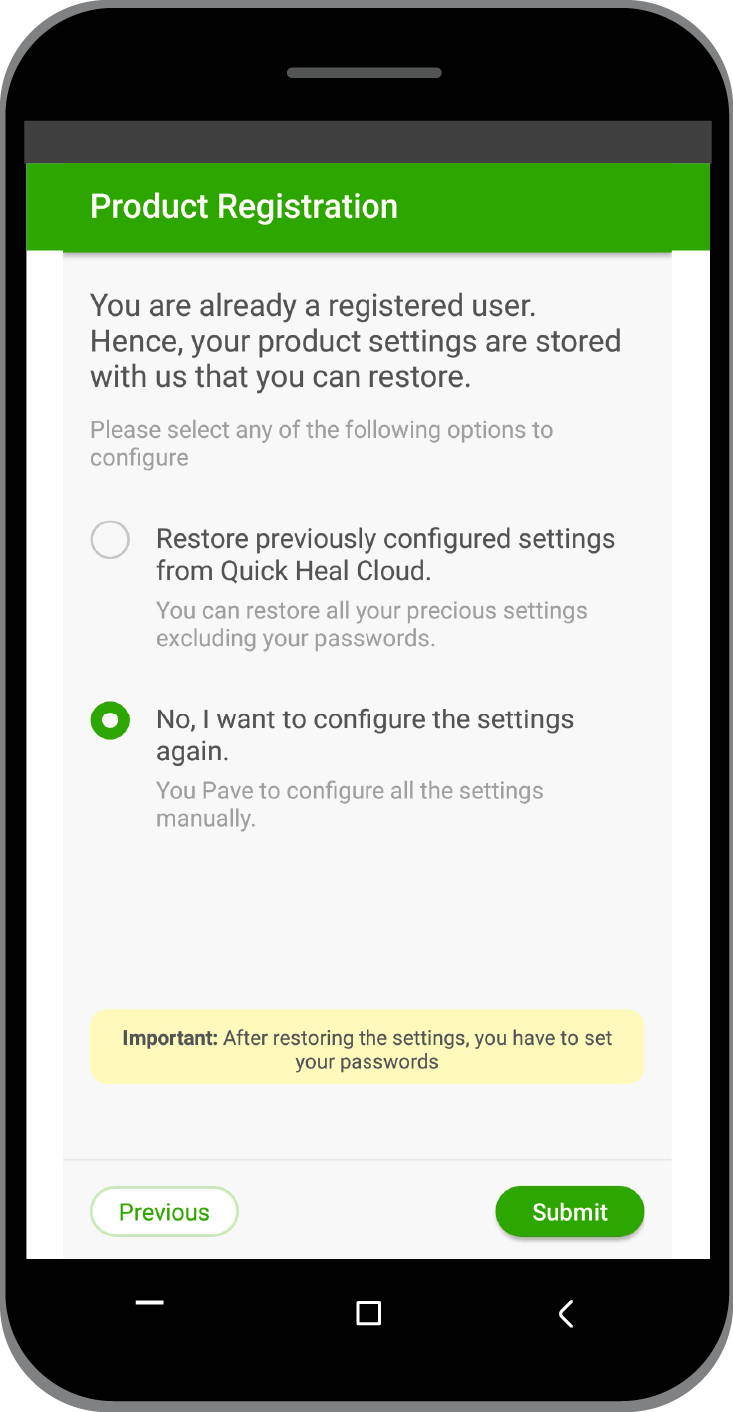
- If you want to configure your setting afresh, select No, I want to configure the settings again and tap Submit.

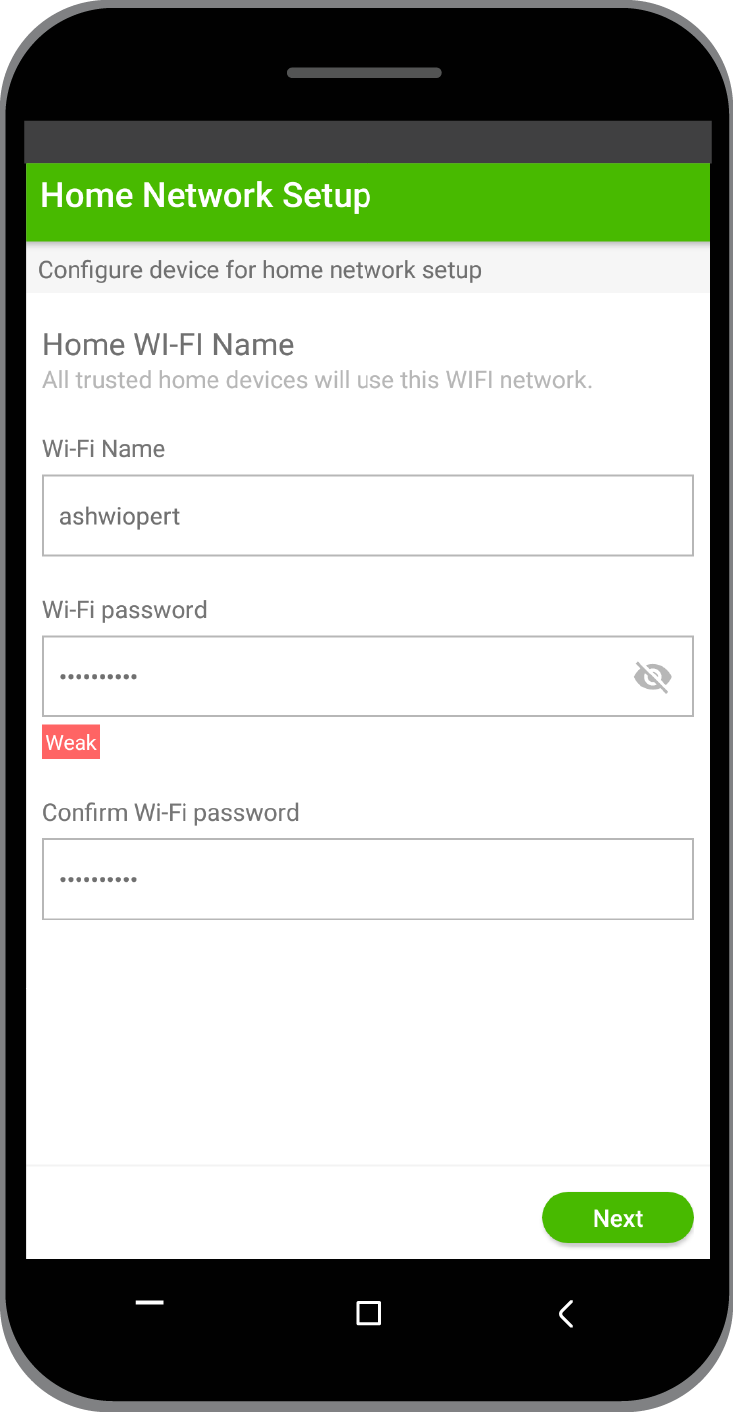
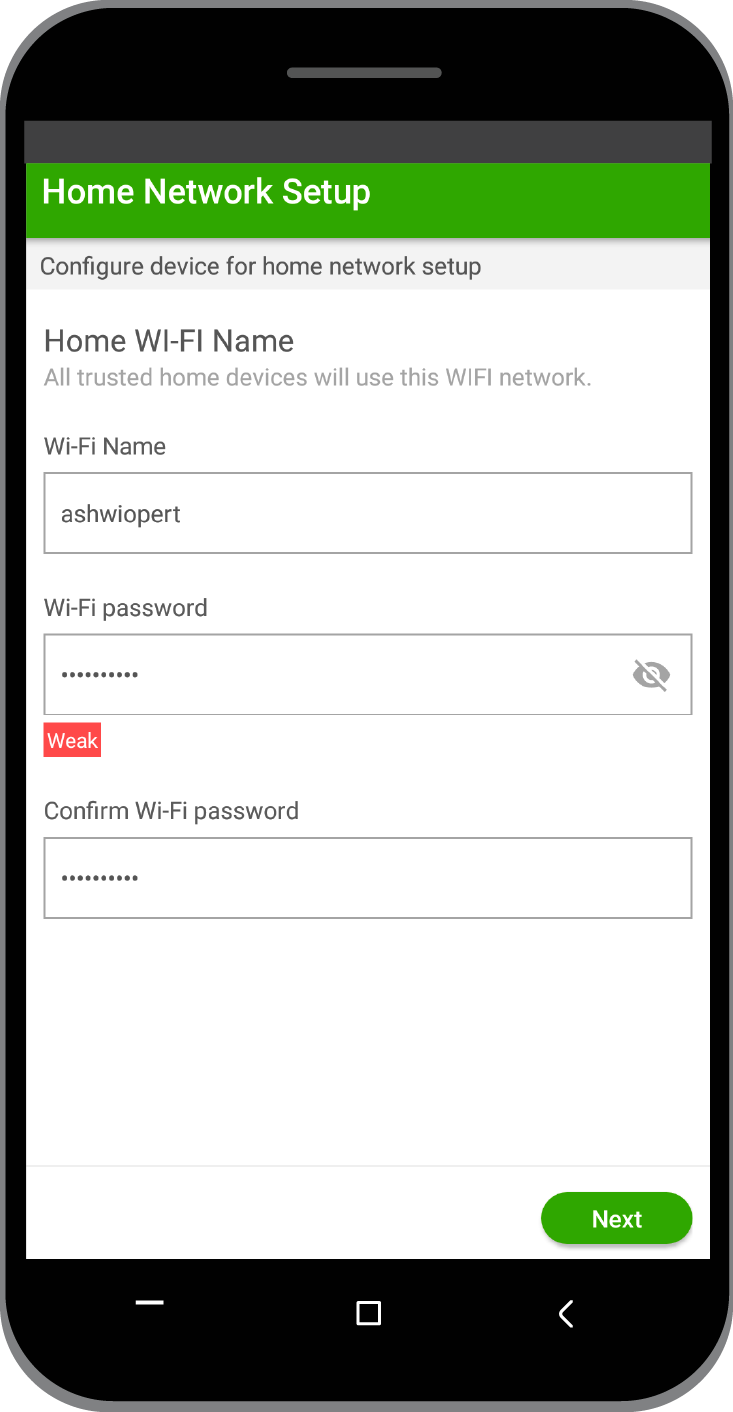
- Enter a name for your Wi-Fi network and the password for that network. You need to connect to this Wi-Fi network to access Internet from the QHHS device. Note that the default network HS-Unbox will disappear from the network list.
- Tap Next.
Tips: Name your network carefully and note it down. After the product registration completes successfully, connect all home devices to this secure network through QHHS device.

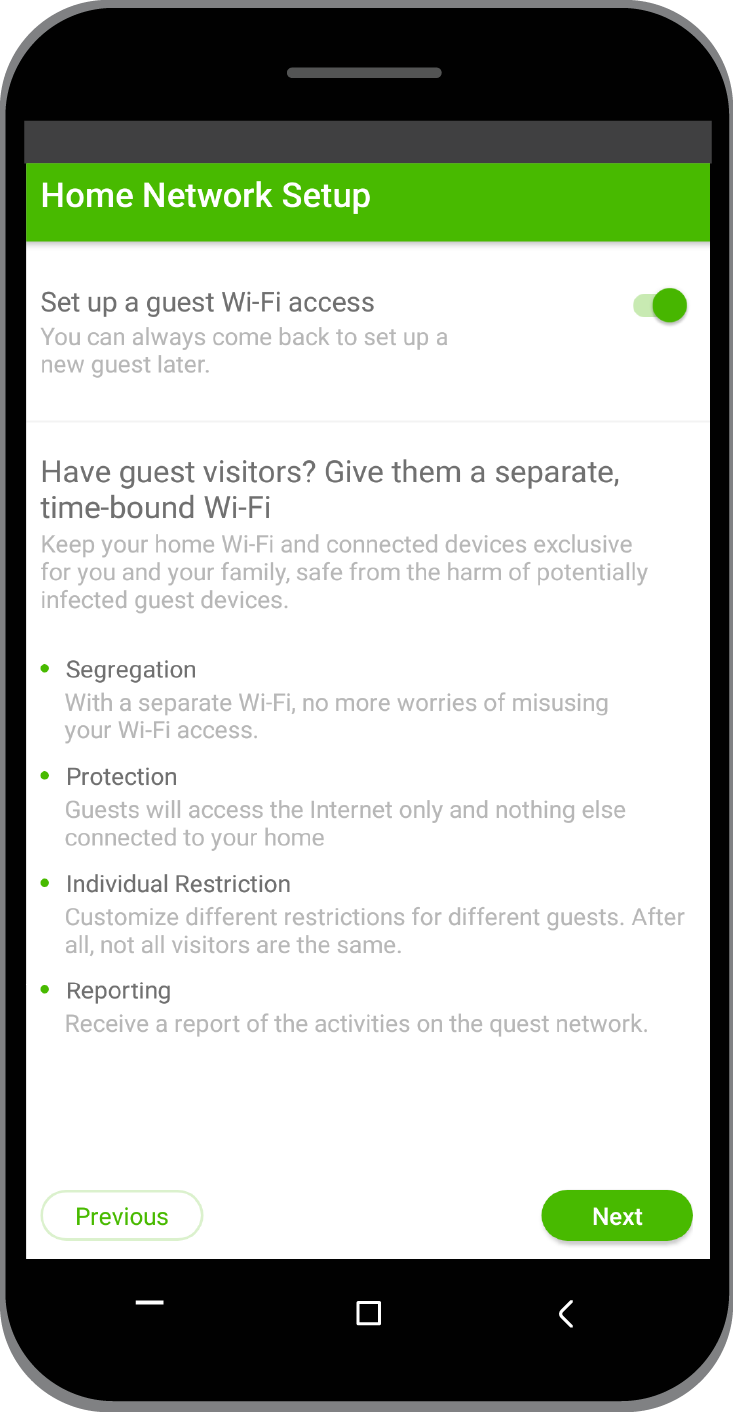
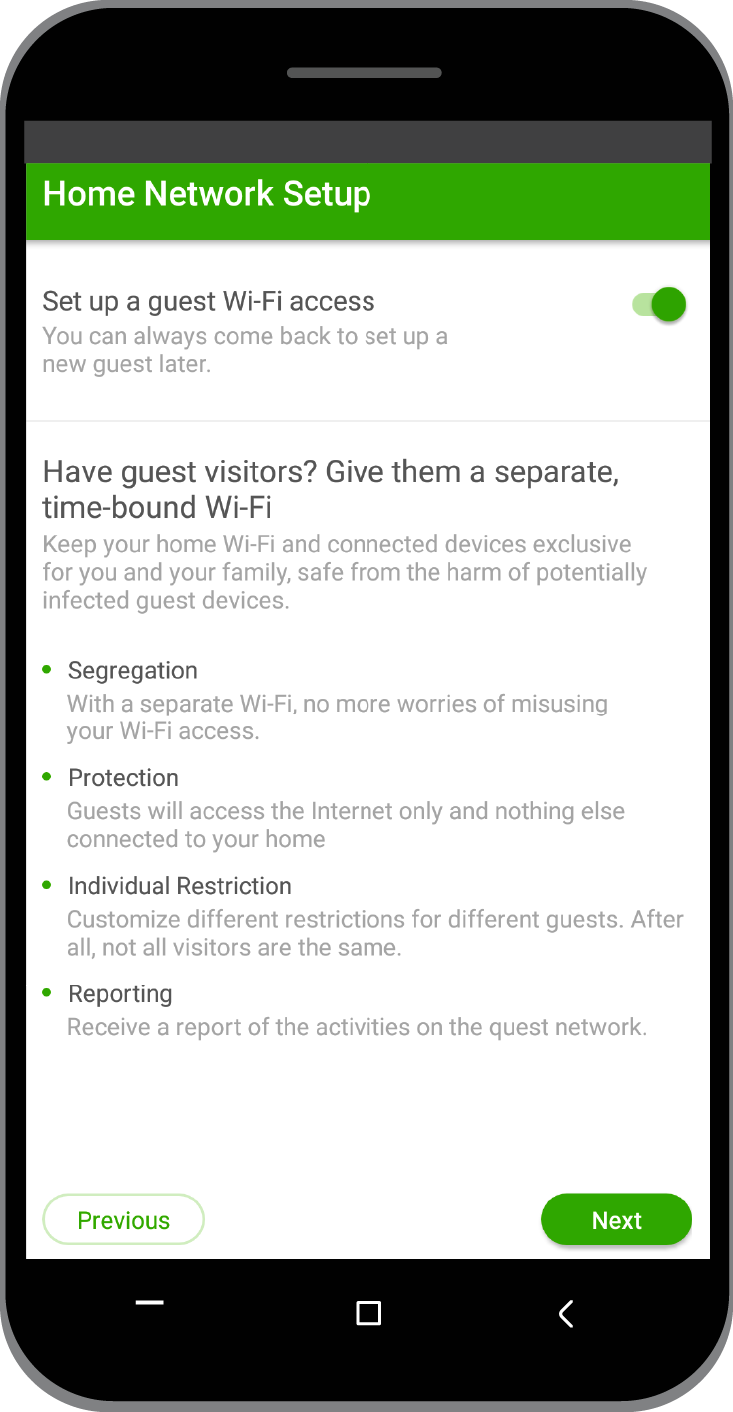
You can set up a guest session for the users who would connect to your network. You may set this session later also.
- Tap Next.
-
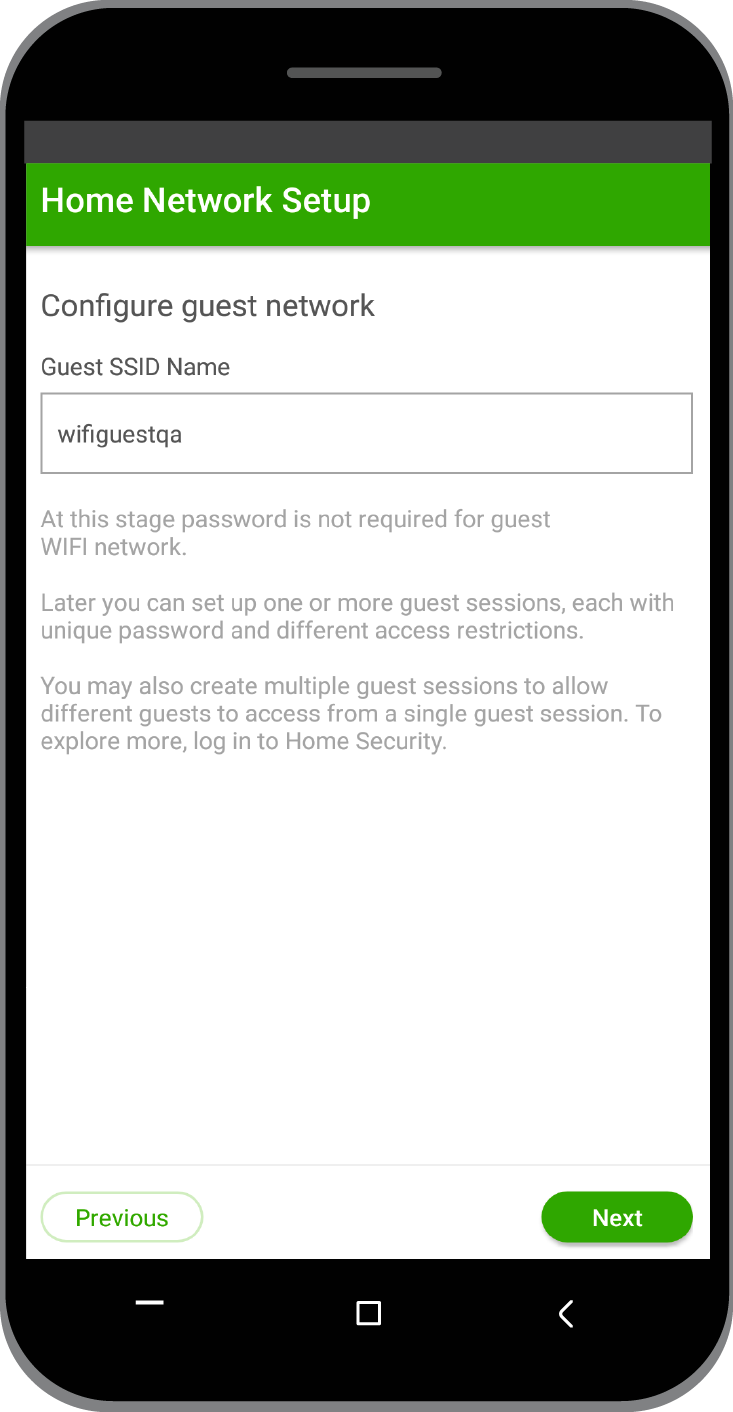
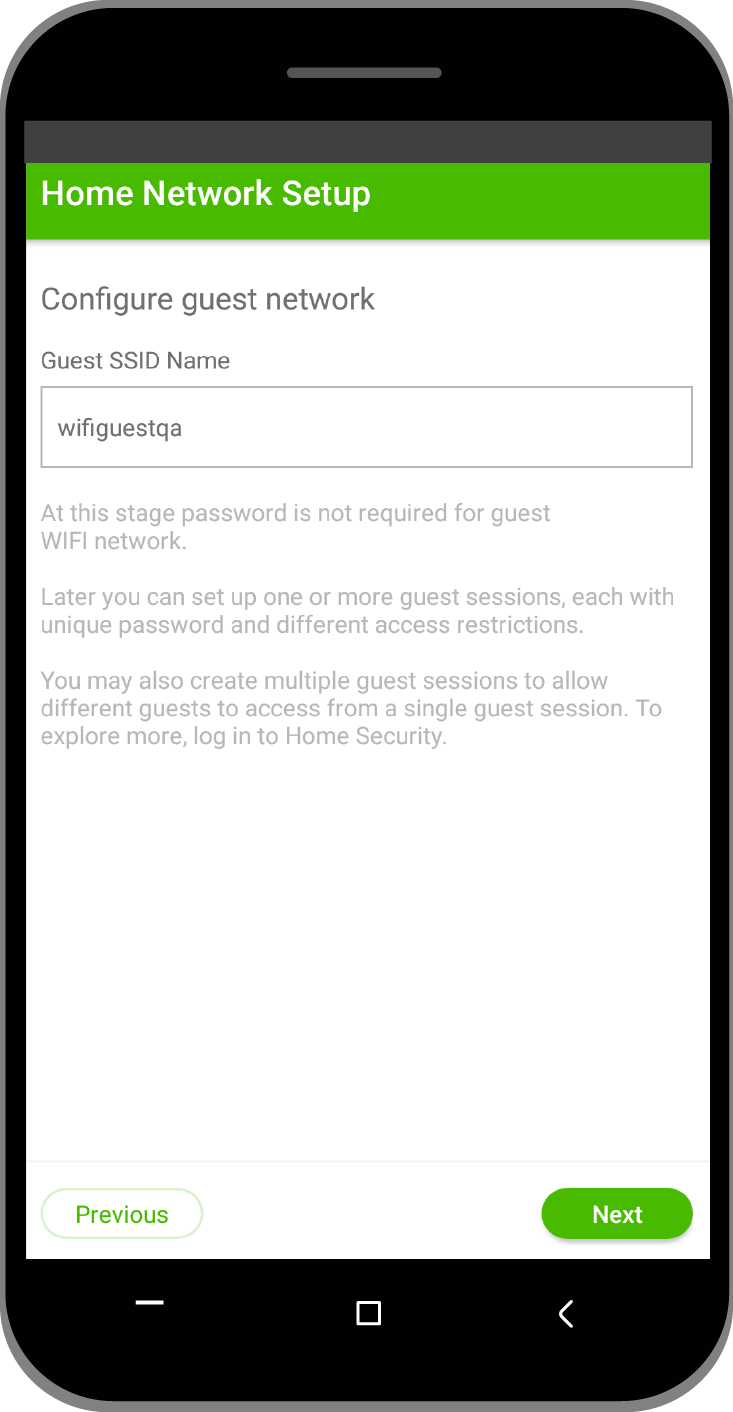
Create a guest network name.
This guest network name will be the network for your guests to access Internet from the QHHS device. You can add any guest to this network.
- Tap Next.

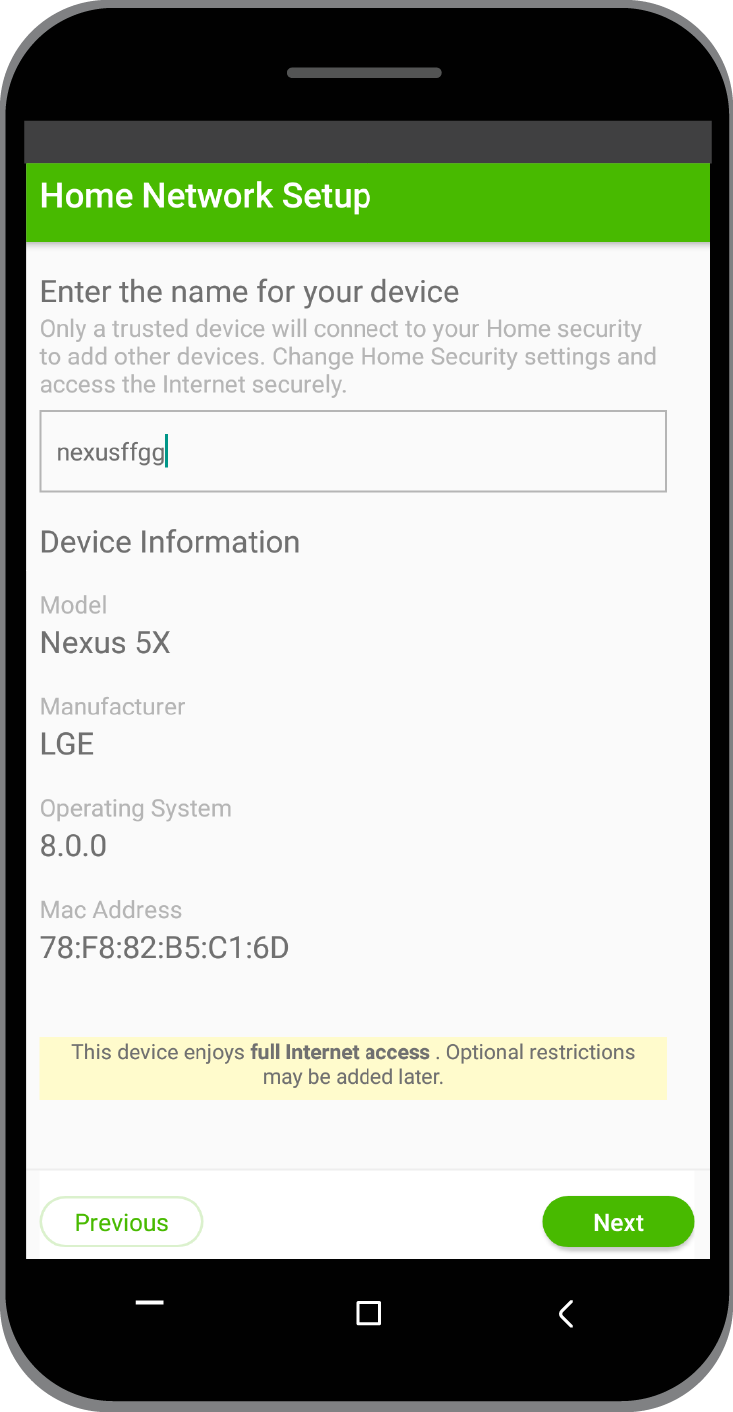
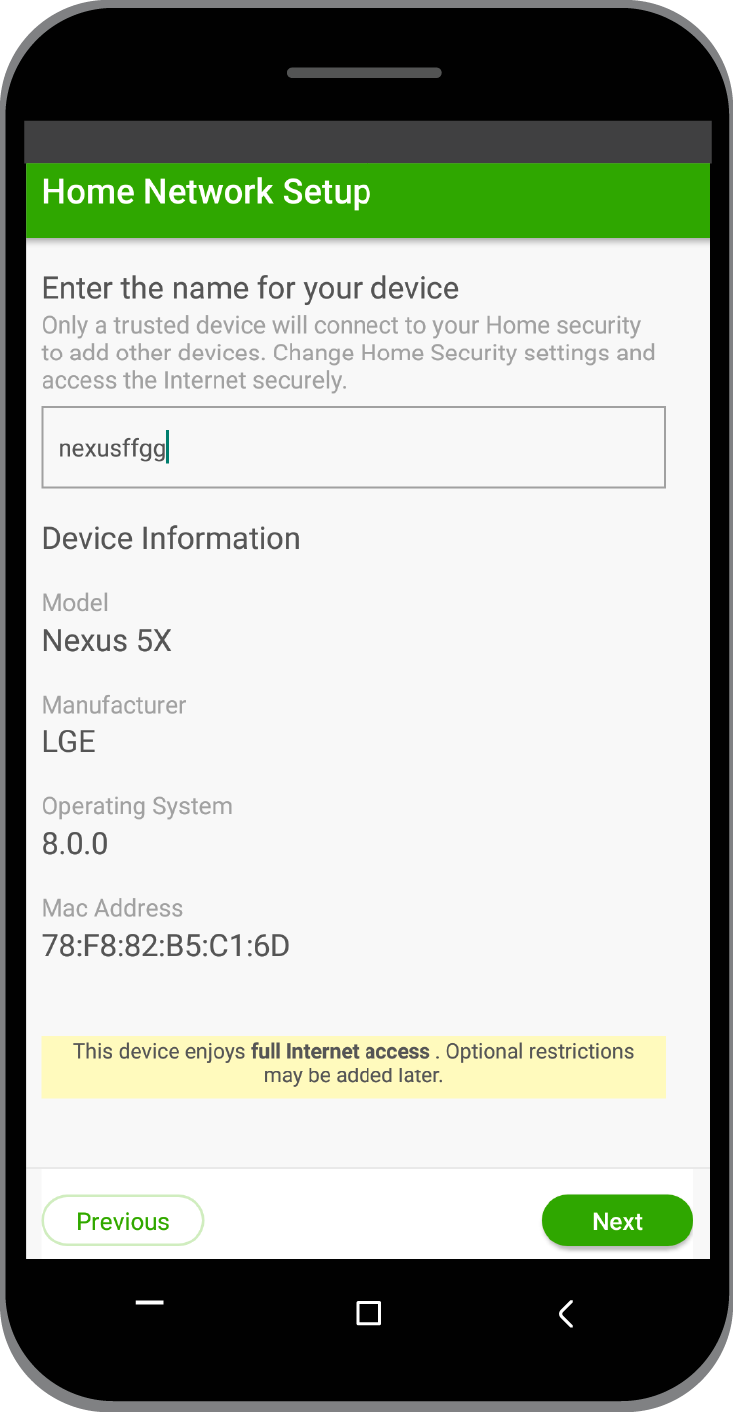
- Enter a device name here.
Note:
- Do not add any special characters (" ' ` * ; > / \) or spaces while you write the device name. If you use multiple words for the device name, write them as a single term. Example: “OfficeMobile” or “Office_Mobile”.
- Take care while writing the device name. The device name should not be duplicate.

- Set a password for the admin user. “admin” will be your username that you cannot change. The password must be at least 8 characters long.
- Tap Next.
Tip: Create a strong password with a combination of numbers, letters, and other characters.
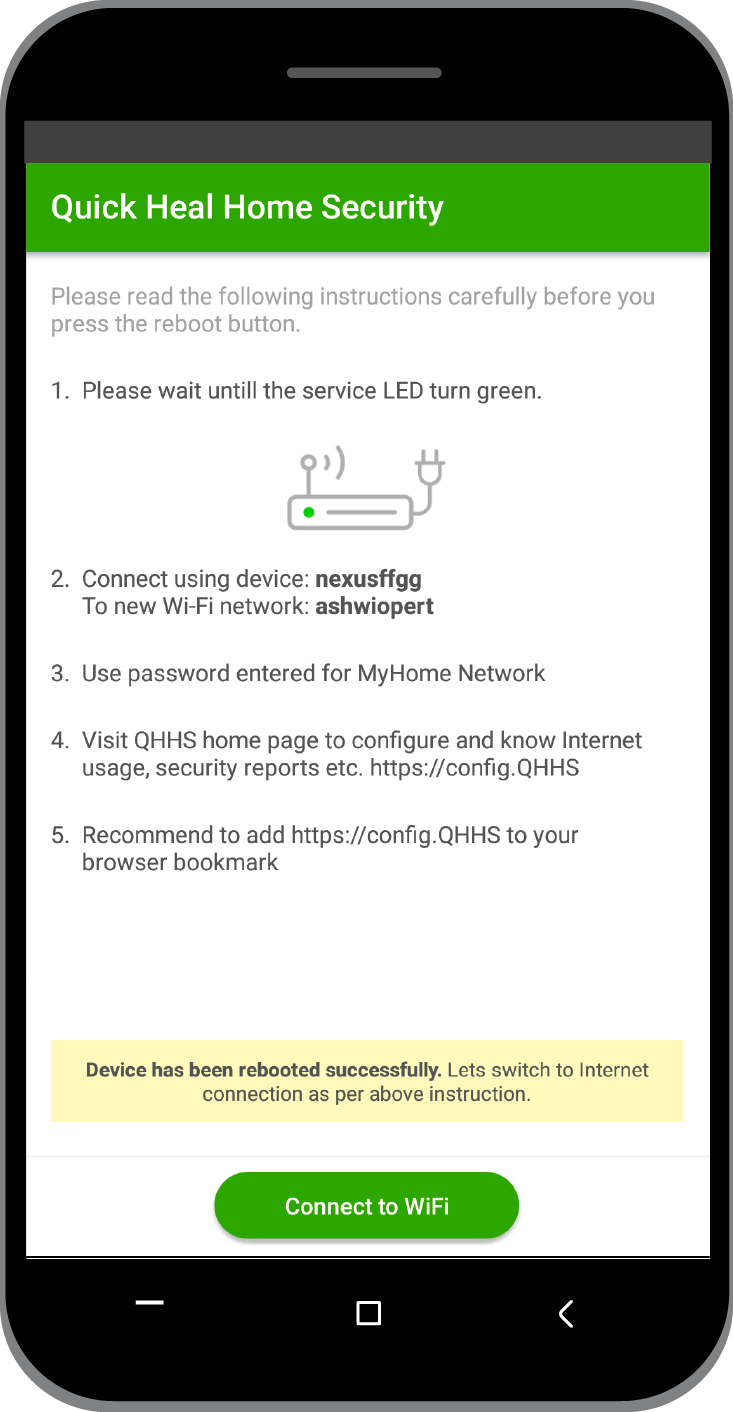
If the configuration is done successfully, the success message screen appears. You must reboot the device to get started.
- Tap Reboot Now.
It may take a few minutes to reboot.
Tips: Check the connection lights on the QHHS device. Wait until all the connection lights turn on.
After all the connection lights on the QHHS device turn on, connect to the new network that you created to secure your device through QHHS device.
If there is any issue in connecting the network, switch off the power of the QHHS device and then switch the device on again.

- Tap Connect to WiFi to connect to the new network that you created.
- Open the QHHS app on your smartphone.
- On the first login page, enter your credentials. Tap Log In.
- The Dashboard appears and you can start managing all the connected devices.
- Go to Google Play.
- Download and install QHHS App on Android supported smartphone.
-
Open the QHHS app on your smartphone.
Make sure that you are connected to the default Internet network: HS-Unbox. To connect to the network HS-Unbox, you have to enter a password. The password is printed on the back of the QHHS device.
During unboxing, you will create a new network. After the unboxing is complete, you must connect to the new network that you create. Note that the default network HS-Unbox will disappear from the network list.

On the first screen, the license agreement and privacy policy appear. Read them carefully.
- Tap I Agree to accept the license agreement and privacy policy.
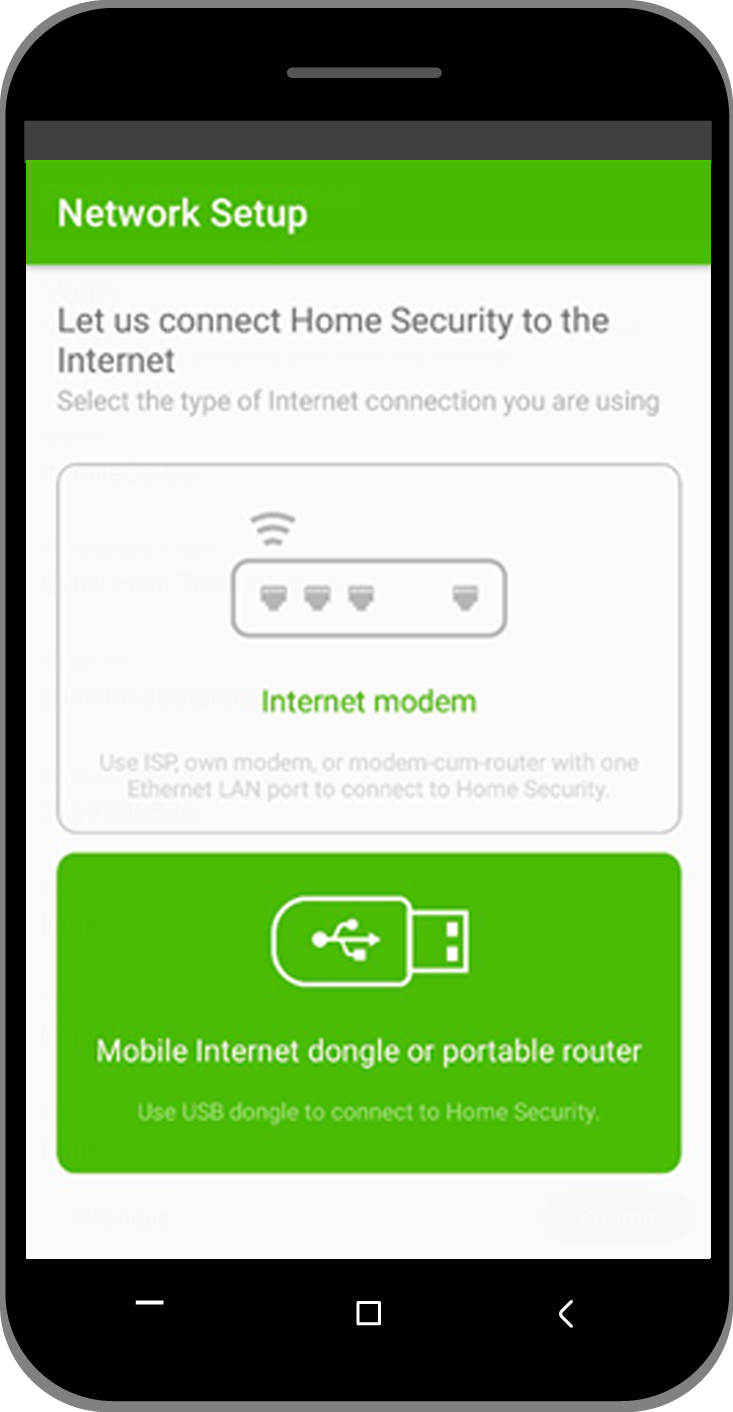
To connect through mobile dongle, tap Mobile Internet dongle or portable router on the Network Setup.
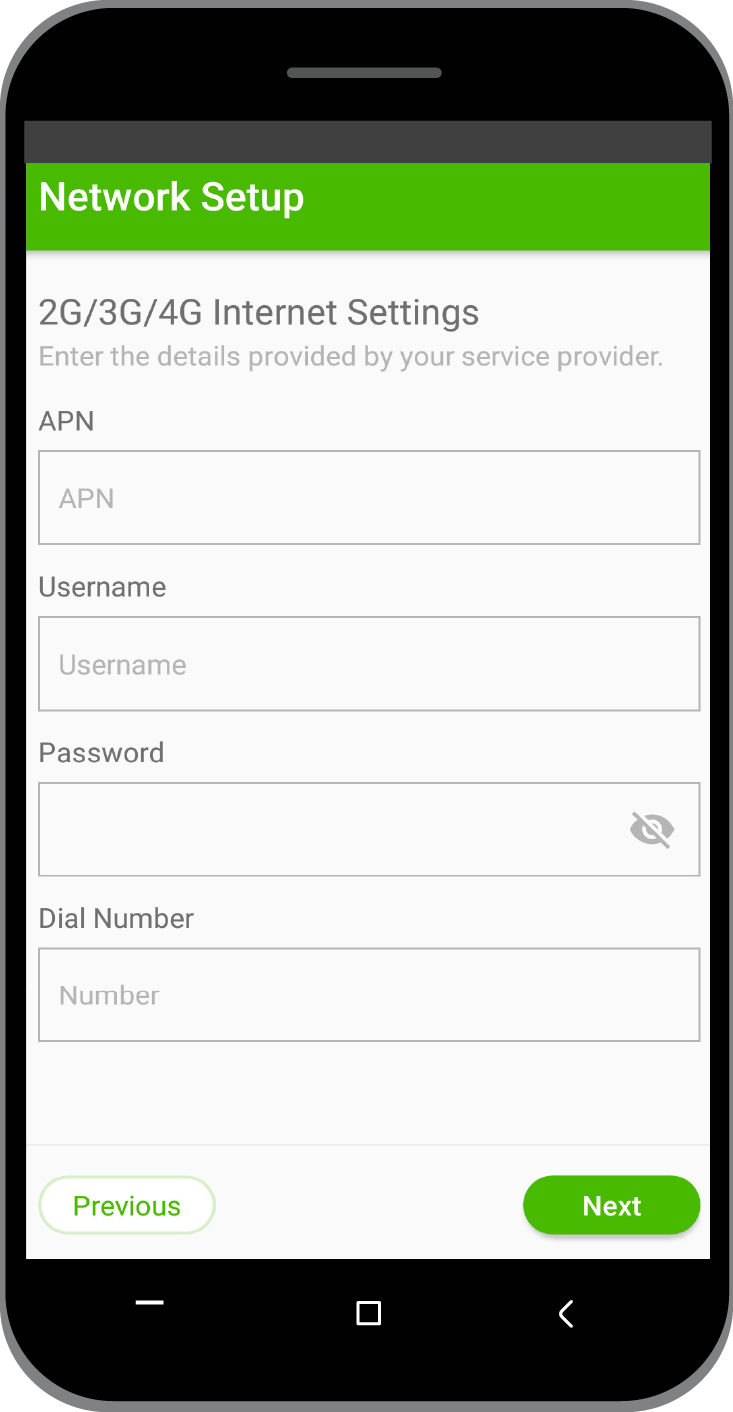
The Mobile Internet dongle setting (2G/3G/4G Internet Settings) screen appears.
- Enter the APN, Username, password, and the dial number as provided by your Internet Service Provider (ISP).
-
Tap Next.
The following screen appears if the connection is successful.
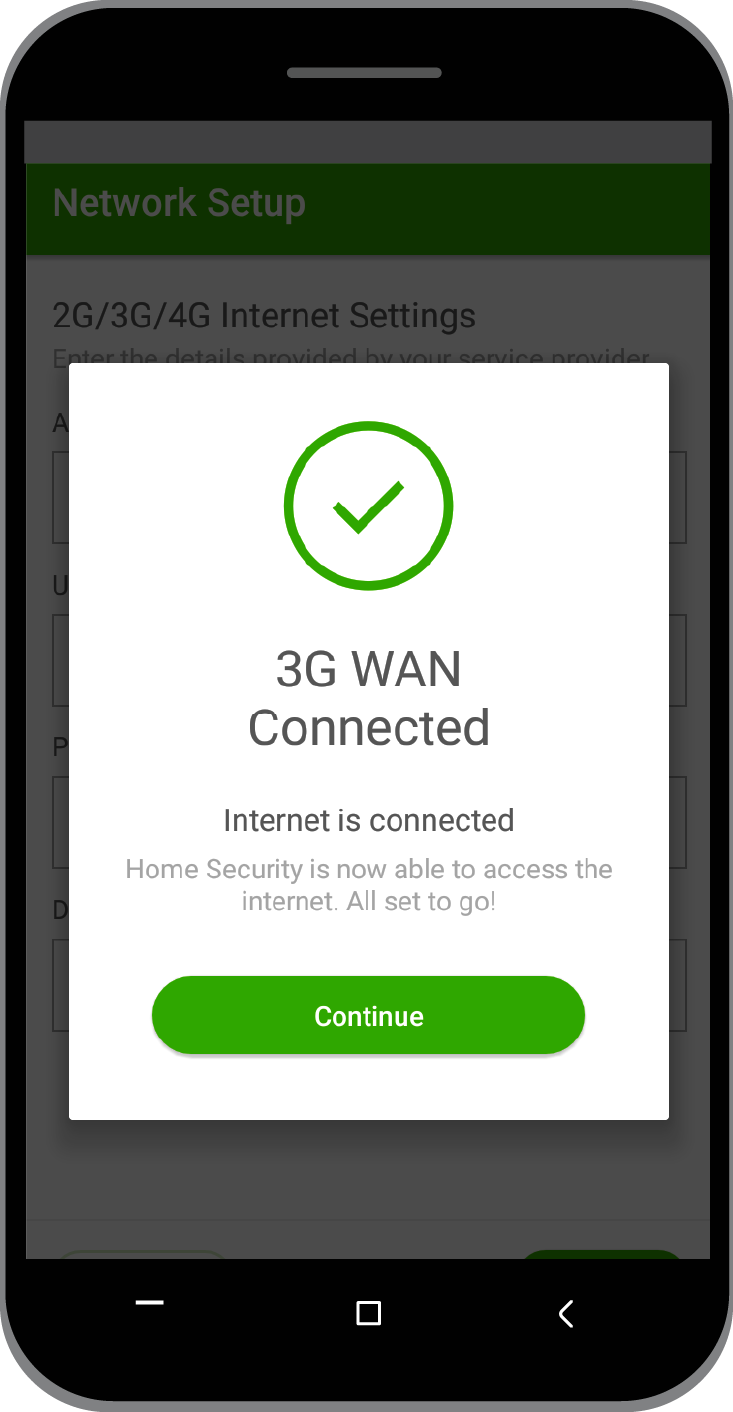
- Tap Continue to progress to the registration screen to complete the registration process.

- Enter the information in relevant fields and tap Next.
A summary of the information that you entered appears. Verify the information carefully.
- Tap Submit


If you have previously registered with the QHHS device, you can restore your settings.
- Select Restore previously configured settings from Quick Heal Cloud and tap Submit.
If you want to register the product afresh, select No, I want to configure the settings again.
A One-Time Password (OTP) is sent to your registered mobile number and email address.
- Enter the OTP on the Product Registration screen and tap Verify.

-
Set a password for the admin user.
“admin” will be your username that you cannot change. The password must be at least 8 characters long. Tips: Create a strong password with a combination of numbers, letters, and other characters.
- Tap Next.

If the configuration is done successfully, the successful message screen appears. You must reboot the device to get started.
- Tap Reboot Now.
It may take a few minutes to reboot.
Tips: Check the connection lights on the QHHS device. Wait until all the connection lights turn on.
After all the connection lights on the QHHS device turn on, connect to the new network that you create.
If there is any issue in connecting the network, switch off the power of the QHHS.
- If you want to configure your setting afresh, select No, I want to configure the settings again and tap Submit.
-
Enter a name for your Wi-Fi network and the password for that network. You need to connect to this Wi-Fi network to access Internet from the QHHS device.
Note that the default network HS-Unbox will disappear from the network list.
- Tap Next.
Tips: Name your network carefully and note it down. After the product registration completes successfully, connect all home devices to this secure network through QHHS device.
You can set up a guest session for the users who would connect to your network. You may set this session later also.
- Tap Next.
A success message appears.
-
Create a guest network name.
This guest network name will be the network for your guests to access Internet from the QHHS device. You can add any guest to this network.
- Tap Next.
- Enter a device name here.
Tip:
- Do not add any special characters (" ' ` * ; > / \) or spaces while you write the device name. If you use multiple words for the device name, write them as a single term. Example: “OfficeMobile” or “Office_Mobile”.
- Take care while writing the device name. The device name should not be duplicate.
- Set a password for the admin user. “admin” will be your username that you cannot change. The password must be at least 8 characters long.
- Tap Next.
Tip: Create a strong password with a combination of numbers, letters, and other characters.
If the configuration is done successfully, the success message screen appears. You must reboot the device to get started.
- Tap Reboot Now.
It may take a few minutes to reboot.
Tips: Check the connection lights on the QHHS device. Wait until all the connection lights turn on.
After all the connection lights on the QHHS device turn on, connect to the new network that you created to secure your device through QHHS device.
If there is any issue in connecting the network, switch off the power of the QHHS device and then switch the device on again.
- Tap Connect to WiFi to connect to the new network that you created.
- Open the QHHS app on your smartphone.
- On the first login page, enter your credentials. Tap Log In.
- The Dashboard appears and you can start managing all the connected devices.
- Go to Google Play.
- Download and install QHHS App on Android supported smartphone.
-
Open the QHHS app on your smartphone.
Make sure that you are connected to the default Internet network: HS-Unbox. To connect to the network HS-Unbox, you have to enter a password. The password is printed on the back of the QHHS device.
During unboxing, you will create a new network. After the unboxing is complete, you must connect to the new network that you create. Note that the default network HS-Unbox will disappear from the network list.

On the first screen, the license agreement and privacy policy appear. Read them carefully.
- Tap I Agree to accept the license agreement and privacy policy.

To connect through Internet modem, tap Internet modem on the Network Setup.
Using Internet modem, you can configure the Internet setting through DHCP, IP address, and PPPoE.
If you select the Internet modem, a cable connection validation screen appears.
Read the on-screen message carefully.
- Tap Confirm.
Note: This is a DHCP (Dynamic Host Configuration Protocol) network protocol that helps to obtain an IP address automatically.

Read the on-screen message carefully.
- Tap Confirm.
Note: If your Internet connection is good, step 1 and step 2 move ahead faster.

If your network does not get the IP address, an error message appears. You need to configure the IP information manually.
- Tap Retry to check the connection or tap Configure to configure the IP address to get connection.

- To configure the IP address, tap PPPOE Settings.
- Enter the Username and password given by your ISP (Internet Service Provider).
- Confirm the password and tap Submit.
You are successfully connected to the Internet.
- Tap OK to close the screen.

Upon connecting to the Internet successfully, a message appears.
- Tap Next.

- Enter the information in relevant fields and tap Next.
A summary of the information that you entered appears. Verify the information carefully.
- Tap Submit.


If you have previously registered with the QHHS device, you can restore your settings.
- Select Restore previously configured settings from Quick Heal Cloud and tap Submit.
If you want to register the product afresh, select No, I want to configure the settings again.

A One-Time Password (OTP) is sent to your registered mobile number and email address.
- Enter the OTP on the Product Registration screen and tap Verify.
-
Set a password for the admin user.
“admin” will be your username that you cannot change. The password must be at least 8 characters long.
Tips: Create a strong password with a combination of numbers, letters, and other characters.
- Tap Next.

If the configuration is done successfully, the successful message screen appears. You must reboot the device to get started.
- Tap Reboot Now.
It may take a few minutes to reboot.
Tips: Check the connection lights on the QHHS device. Wait until all the connection lights turn on.
After all the connection lights on the QHHS device turn on, connect to the new network that you create.
If there is any issue in connecting the network, switch off the power of the QHHS device and then switch the device on again.

- If you want to configure your setting afresh, select No, I want to configure the settings again and tap Submit.
- Enter a name for your Wi-Fi network and the password for that network. You need to connect to this Wi-Fi network to access Internet from the QHHS device. Note that the default network HS-Unbox will disappear from the network list.
- Tap Next.
Tips: Name your network carefully and note it down. After the product registration completes successfully, connect all home devices to this secure network through QHHS device.
You can set up a guest session for the users who would connect to your network. You may set this session later also.
- Tap Next.

-
Create a guest network name.
This guest network name will be the network for your guests to access Internet from the QHHS device. You can add any guest to this network.
- Tap Next.
- Enter a device name here.
Note:
- Do not add any special characters (" ' ` * ; > / \) or spaces while you write the device name. If you use multiple words for the device name, write them as a single term. Example: “OfficeMobile” or “Office_Mobile”.
- Take care while writing the device name. The device name should not be duplicate.

- Set a password for the admin user. “admin” will be your username that you cannot change. The password must be at least 8 characters long.
- Tap Next.
Tip: Create a strong password with a combination of numbers, letters, and other characters.

If the configuration is done successfully, the success message screen appears. You must reboot the device to get started.
- Tap Reboot Now.
It may take a few minutes to reboot.
Tips: Check the connection lights on the QHHS device. Wait until all the connection lights turn on.
After all the connection lights on the QHHS device turn on, connect to the new network that you created to secure your device through QHHS device.
If there is any issue in connecting the network, switch off the power of the QHHS device and then switch the device on again.
- Tap Connect to WiFi to connect to the new network that you created.
- Open the QHHS app on your smartphone.
- On the first login page, enter your credentials. Tap Log In.
- The Dashboard appears and you can start managing all the connected devices.